• Skip to primary navigation
  • Skip to main content
  • Skip to primary sidebar
  • Texas A&M Forest Service
  • Texas A&M Veterinary Medical Diagnostics Laboratory
  • Texas A&M AgriLife Extension Service
  • Texas A&M AgriLife Research
  • Texas A&M College of Agrculture and Life Sciences
Hunt County Master Gardeners
Hunt County Master GardenersTexas A&M AgriLife Extension Service
  • Menu
  • Home
  • Articles
  • About
    • Who We Are
    • Program Overview
    • FAQ
    • Contact
    • Master Gardener Emeritus
    • Heritage Garden
      • Animal Name Bed
      • Heritage Garden Plant Database
    • Hunt County Master Gardeners Shutterfly Photos
    • Junior Master Gardener Program
    • Outdoor Learning Center
  • Events
  • Links
    • Hunt County Extension Office
    • Texas AgriLife Extension Bookstore
    • Aggie Horticulture
    • Aggie Turf
    • Texas Master Gardener
    • Texas Master Gardener Association
    • Texas Master Gardener License Plates
  • Resources
    • Plants for East Texas
    • Vegetable Resources
    • Fruit & Nut Resources
    • Texas Plant Disease Diagnostic Lab
    • Soil, Water and Forage Testing Lab
    • Texas Superstar Plants
    • Earth-Kind Landscaping
    • Xeriscape
    • Insects in the City
    • USDA Plant Hardiness Map
  • CEUs
    • Log My Hours
    • Texas Master Gardener Association Events
    • Master Gardener Advanced Training
    • Earthkind Online Classes
    • Landscape Design Study Courses
    • American Horticultural Society Events
    • Texas Botanical Gardens and Arboreta

Dragonflies in the Garden

October 2, 2019 by jhsanger

Dragonfly

Photo by John Sanger

Dragonflies in the Garden by John Sanger, Hunt County Master Gardener

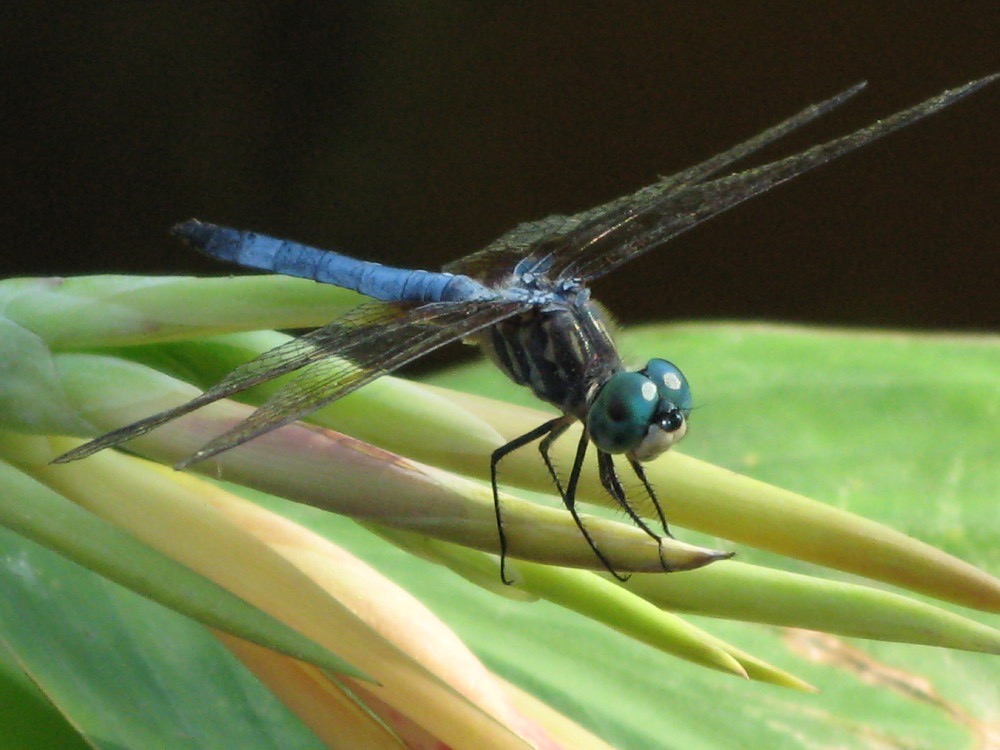
One of the most rewarding aspects of gardening is enjoying the many wild creatures that come to visit. Some of my favorite visitors are dragonflies. They are fascinating to watch and photograph.

The fossil record tells us that the ancient ancestors of dragonflies were around long before the dinosaurs, and some of these insects had wingspans of more than two feet! Fortunately today’s dragonflies are much smaller. There are more than 160 species of dragonflies found throughout Texas, and they come in an incredible variety of brilliant colors, shapes and sizes.

Dragonflies are beneficial insects that prey on other flying insects such as mosquitoes, flies, gnats and flying ants. They grasp their prey with their legs in flight and eat while airborne.

Dragonflies are amazing flyers and can hover in place, or fly forwards, backwards or straight up, much like a helicopter. They are among the fastest flying insects, and can fly for hours on end without resting. If you are lucky, you might see a dragonfly swarm – a large group of adult dragonflies feeding on a large population of gnats or other flying insects. It is quite an impressive display of aerial acrobatics!

Dragonflies spend most of their lives in and around water. The adult dragonfly lays eggs in the water or on water plants. The eggs hatch and the nymphs grow and molt for several months to several years, feeding on aquatic insects, tadpoles and even small fish.

After 9-14 molts through stages called instars, the nymph emerges from the water onto land, its exoskeleton breaks open and the adult dragonfly emerges and extends its wings. Once the wings dry and harden, the dragonfly can take flight. Adult dragonflies can live from a few weeks to one year.

The best way to attract dragonflies is to incorporate a water feature into your landscape. Ponds give dragonflies a place to lay their eggs, and submerged vegetation gives dragonfly larvae places to hide. Plants around the edges of the pond give larvae places to crawl when emerging to molt into adults. A larger pond will support a greater variety of dragonflies and will provide more hiding places for larvae – especially important if fish are present.

If you don’t already have one, consider adding a water feature to your landscape. It can attract dragonflies to your property, as well as a great variety of other wildlife. Take the time to welcome and study these amazing beneficial insects as they visit your garden. They are truly a wonder of nature.


Filed Under: Entomology, Wildlife Tagged With: Dragonflies

Save the Bees by Preventing Bee Swarm Infestations

January 9, 2019 by jhsanger

Save the Bees by Preventing Bee Swarm Infestations by De Anna Penninga, Hunt County Master Gardener.

In Spring and Summer, phones will ring for area beekeepers from homeowners with concerns about Honey Bees co-habitating in or around their homes. Michael Merchant, Ph.D., Urban Entomologist, Texas AgriLife Extension writes about Honey Bee behavior in his article “Honey Bee Swarms and their Control” and offers some good information to help homeowners. Now is the time to share some information to help homeowners “Save the Bees” and prevent swarm infestations.

First, a bit of information about bees, their behavior, and swarming. In his article, Dr. Merchant writes about honey bee behavior: “…that Honey bees are not typically aggressive, they do not seek out people or animals to attack. Honey Bees are defensive and will attack what they perceive as a threat to their hive.” Texas A&M AgriLife Extension Service recommends that you contact a pest control professional to manage a swarm because there is always risk when bees are in close proximity to humans. Honey bees do not nest in the ground. So, if you roll over a hive in the ground, those aren’t honey bees. Honey Bees swarm to start a new hive. The old queen gathers a bunch of workers, they load up on honey, and they leave their old hive in search of a new location to establish a new hive.

Warm spring months, April and May, are prime times for Honey Bees to swarm. People will see a mass of bees hanging on trees, on fences, and other places out in the open and the calls to beekeepers roll in. People need to understand that this bee cluster, out in the open, is just the bees’ staging mode. Most of the bees are resting while scouts are out finding a safe suitable spot for their new hive to move. Once that place is selected, usually within 24 to 48 hours, the bees move on.

Where bees choose to live is generally out of your control. Unfortunately for humans, there are numerous areas around our homes and gardens that offer the perfect conditions for a new honey bee hive to move. Honey Bee scouts are looking for nooks, cavities or voids in trees, sheds, garden walls and the inside of walls in your home. South or east facing sides of a home allow the hive to take advantage of the sun’s warmth. Eaves and soffits offer easy access to the inside of your home. A hole, crack or gap as small as one eighth of an inch is all bees need to move in to your home. Honey bees that have moved into a structure should be removed or destroyed as quickly as possible. The longer you wait, the more difficult and costly their removal will be. That is because a single hive can grow quickly a population of 40,000 bees or more. Once established, bees will fill the cavity with honeycombs, honey, and hive waste until the cavity is full. Don’t try to use honey or wax removed from a treated hive because those are often contaminated with dust, insulation or insecticides and are unsuitable for human use.

The next round of calls come in the summer when homeowners finally become aware that a honey bee hive has taken up residence in an unwanted location in or near their home. Many homeowners have heard the plight of the honeybee and are adamant beekeepers try to “save the bees!” Most often, that is just not cost effective. Removing a honey bee hive can easily cost hundreds of dollars causing extensive damage, so prevention is the best solution. Homeowners can assume that if a bee hive has been in a home before, then that home is more prone to a future unwanted honey bee hive, so be sure to take annual preventative measures to keep bee problems from returning.

Prevention is the most important thing to “save the bees” and prevent honey bees from infesting undesirable locations and creating substantial financial impacts. Fall and Winter are great times of year for eliminating possible points of entry by bees into buildings. Removing other potential nest sites is the best way to prevent serious problems with bees around structures. All holes in bricks, cracks in wood and brick joint holes, holes where pipes and wiring enter, cracks in window framing, knot holes in wood siding, need to be filled. Most of these holes can be filled with caulk, but air flow holes should be blocked with wire screen with less than 1 /8 inch mesh. Chimneys should be properly capped.

Texas Beekeepers Association has an interactive map that lists professionals who do bee removals by county for Texas. http://texasbeekeepers.org/swarms

Source: Michael Merchant, Ph.D., Urban Entomologist, Texas AgriLife Extension Honey Bee Swarms and their Control

Filed Under: Entomology Tagged With: Bees

Monarch Butterflies

June 13, 2018 by jhsanger

Monarch Butterflies by Byron Chitwood, Master Gardener.

Monarch Butterflies reach our area in early to mid spring.  Surprisingly some of these butterflies overwintered in the Mariposa Monarca Biosphere in Mexico. Some of the later spring migration that you witness may be the offspring of earlier ones that migrated from Mexico and reproduced along the way.  There are several other mass migrations of Monarchs, some of which are the ones west of the Rockies and others that overwinter in Florida.  The ones that we see and are interested in are the ones that are migrating east of the Rockies and through the Texas route.  Their life cycle is fascinating and this article will briefly describe it.

In the northern migration, the females mate along the way.  They can lay from 200-1,000 eggs.  These eggs are then laid on the underside of a milkweed leaf.  Only one egg is deposited per leaf.  After the female has laid her eggs, she dies.  Males die after they have mated up to fifteen times.  The eggs hatch after 3 to 8 days and the larva begin feeding on the milkweed leaf.  Apparently, milkweed leaves are the only food the larva eats during their caterpillar stage of life.  During the caterpillar stage, the larva goes through five stages.  At the end of each stage, the larva molts or sheds its outer skin and a larger caterpillar emerges.  At the end of the fifth stage, the caterpillar spins a silk cocoon and hangs upside down from the milkweed host plant until it morphs and emerges as a butterfly.  The young butterfly that has emerged waits until its wings have dried and then it flies off and heads north until she reaches sexual maturity in 3 to eight days at which time she mates and the life cycle begins all over again.  This life cycle continues among her following generations four or five times until these later generations reach their northern most part of the migration in southern Canada.

There are theories on how they know where to go.  My guess is that they follow the milkweed route as the weeds mature going from south to north in the spring and then north to south in the fall.  The milk weeds are the key to their survival.  As the larva consumes the leaves of the milkweed plant, they ingest a poison from the plant’s leaves that protects them throughout their life cycle against predators.  Without the milkweed plant, there would be no monarch butterflies.  Soy beans have become a huge cash crop for farmers.  The farmers and seed producers have determined that weeds in soy bean fields compete with the soy bean plants for water, nutrients from the soil and direct sunlight.  Soy bean genes have been manipulated (GMO) such that soy bean plants are Roundup® resistant.  If these GMO seeds are planted, a field can be sprayed with Roundup® to kill the weeds and not adversely affect the soy bean plants.

I am not against using GMO (genetically modified organism) seeds.  We have a whole world out there to feed and GMO plants have increased yields dramatically where used.  Our mission is to plant Monarch Butterfly Way Stations along the butterfly’s migration.  Any and everybody can plant a few milkweed seeds in a small garden spot.  It is the Monarch’s job to sniff out these delicious and poisonous weeds to insure their survival.  Hunt County Master Gardeners have such a plot in our Heritage Garden and we have many Monarchs visit for a tasty meal and to deposit a few eggs.

Filed Under: Entomology Tagged With: Butterflies,

Fire Ants

May 23, 2018 by jhsanger

Fire Ants by Byron Chitwood, Master Gardener.

It’s that time of the year when you begin to notice that you have fire ants in your yard or pasture. Actually, they have been there all through the winter. They just set up housekeeping deeper underground to avoid the cold. Now that the temperature has warmed up, they have moved closer to the surface of the ground, especially after a rain. As the water level rises after a rain, fire ants will build a fluffy mound above the surface of the water level to protect the queen and babies. If you happen to disturb one of these mounds, they will come out in mass and attack and sting everything that moves. Where they sting, will get red, hurt, itch and eventually develop into a pus pocket. People who are highly sensitive to fire ants might require medical treatment. Take precautions when working in the yard or garden. Precautions include wearing knee high rubber boots with pants legs tucked in. Wear gloves and long sleeves. Work in the yard or garden during daylight hours so that you can see and avoid mounds.

Fire ants can be controlled using the “Texas Two Step” approach. Note, I said controlled, not eliminated. This method consists of the following procedures:

Broadcast Bait: Broadcast bait throughout your lawn and vacant lots with a hand held or push type spreader. Set the spreader on its lowest setting. There are many brands of bait available at your favorite garden and yard supply store. Follow the directions on the package. Most advise broadcasting 1 to 1.5 pounds per acre. This is not very much but that is all that is required for control. The fire ants will forage for food during the night and carry it back to the den where it is fed to the other ants and the queen. When the queen dies, that will be the end of the colony since she is the only ant in the family that lays eggs. All of the ants will eventually die, either from eating the bait or at the end of their life cycle.  Apply bait only when the weather is warm enough for the ants to forage. To determine if they are foraging, apply a small amount of bait on top of the mound and if it is gone within 30 minutes or overnight, they are actively foraging. Do not disturb the mound after application. This can cause the ants to move their colony.

Mound Treatment: If you have a problem mound, one that you can’t avoid, treat it by applying either a granular, liquid or dust type insecticide directly to the mound. Follow the directions on the insecticide container. Usually, the directions recommend sprinkling a small amount on the mound and watering it in with several gallons of water. Use a hand held watering can if you have one or a gentle spray head on the end of your garden hose. Water very slowly so that the insecticide has time to sink in and reach the deepest part of the ant colony.

It would good practice for your neighbors to treat for fire ants at the same time. It doesn’t take long to spread the bait and usually, it is more economical to buy large quantities of ant bait which can be shared with your neighbors. Most ant baits contain oil which will eventually get rancid after the package is unsealed. Sharing the cost and treating a larger area will forestall the next invasion of fire ants on your property. For further information on fire ants, go to the website http://fireants.tamu.edu.

Filed Under: Entomology, Turf Tagged With: Fire Ants,

Monarchs: From Miracle to Disaster

March 20, 2015 by stephaniesuesansmith

art of gardening flyer

Filed Under: Entomology, Events Tagged With: Butterflies,

Controlling Grasshoppers

June 20, 2014 by stephaniesuesansmith

Controlling Grasshoppers by Stephanie Suesan Smith, Ph.D.

Grasshoppers are once again so prevalent this year that they seem to be taking over the landscape.  They are more prevalent in dry years because in wet years spring rains drown eggs and nymphs (baby grasshoppers).  Since we have had very little rain, however, most of the grasshoppers have survived to cause us problems.

The best product to kill grasshoppers on a long term basis is NOLO bait.  It contains a protozoan (Nosema locustae) that infests the grasshoppers.  It kills the small ones and makes the bigger ones sick, so they do not eat as much or reproduce as much.  It is completely specific to grasshoppers and will not hurt birds, pets, or other animals, even if they eat the dead grasshoppers.  In addition, it will kill grasshoppers that feed on dead grasshoppers who are infected with the protozoan.  NOLO bait is allowed in organic gardening.

NOLO bait is most effective when applied to nymphs and eggs.  It does not do as much to large grasshoppers.  It is also relatively slow to act, so a grasshopper can do a lot of damage before dying.

The other choice is to actively spray the grasshoppers.  Spraying them with sprays containing carbaryl or permethrin are allowed on both vegetables and other crops and will kill the grasshoppers quickly.  However, they do not have a long residual effect and must be reapplied frequently or after a rain.  In addition, they kill other, beneficial insects as well as the grasshoppers.  They are also not allowed in organic gardening.

Grasshoppers are one of the most difficult insect pests to control because they are so mobile.  When you kill the ones on your garden or ornamental landscape, more just fly in and start munching away.  For best results, remember to start control early in the season when the nymphs are small and to be persistent in your control efforts.

Filed Under: Entomology Tagged With: Grasshoppers,

Spider Mites

June 16, 2014 by stephaniesuesansmith

Spider Mites by Stephanie Suesan Smith, Ph.D.

Spider mites are common pest problems, especially for indoor plants.  They suck out the sap from leaves and leave behind bruises and other problems.  This may make the leaves become discolored or even drop prematurely.  If enough leaves drop, the plant dies.

Regular insecticides will not kill spider mites.  They are arachnids, not insects.  You must use a special chemical called a miticide to kill them.  First, though, you need to understand their life history to know what you are up against.

Spider mites are small and can be difficult to see with the naked eye.  Their colors range from red and brown to yellow and green, depending on the species of mite and the time of year.  Many spider mites produce webbing, or webs, when they are present in great quantities.  It is usually this webbing that catches the eye of plant owners.

The most important mite is the twospotted spider mite.  This is the mite that attacks indoor plants, vegetables, fruits, and outdoor flowers.  It produces a lot of webbing.

Spider mites develop from eggs, which are usually laid near the veins of leaves.  Most spider mite eggs are round and extremely large in proportion to their mother.  After the eggs hatch, they remain stuck to the leaves and can be useful in diagnosing the presence of spider mites.

Most spider mite activity peaks in the summer.  Spider mites can become full grown in as little as a week after being born.   After mating, females may produce a dozen eggs daily for a couple of weeks.  You can see how this rate of reproduction can rapidly overtake a plant.

Dry conditions favor spider mites.  They feed more.  At the same time, most of their natural enemies have trouble living under very dry conditions, so the spider mites reproduce unmolested.

Spider mites are hard to control.  There are natural enemies such as a small, dark-colored lady beetle known as a “spider mite destroyers”, pirate bugs, big-eyed bugs, and predatory thrips.  Other mites also eat spider mites.  One of the reasons spider mites may get out of control is that common pesticides kill the predators of mites but not the mites themselves.

One thing that helps control spider mites is adequate watering during dry periods.  This helps the plants resist spider mites, and the water itself can blow spider mites off the plant.  Most pesticides are ineffective on spider mites.  The most effective pesticide is the use of horticultural oils at the summer rate.  Great care must be taken to get the oil on all leaf and stem surfaces to kill the spider mites.  Since horticultural oils do not kill eggs, the treatment should be repeated in seven days to kill the newly hatched mites.

Filed Under: Entomology Tagged With: Spider Mites,

Squash Bugs

May 19, 2014 by stephaniesuesansmith

Squash Bugs by Stephanie Suesan Smith, Ph.D.

Squash bugs are some of the most frustrating pests in the home garden.  They feast on a wide array of plants in the curcubit family and can do some pretty serious damage to them.  They pierce the plants and suck out the sap, causing the plants to wilt or even die.  They are also hard to kill.  They can be controlled, though, with a little effort.

To control squash bugs, it helps to understand their life cycle.  Adult squash bugs are tiny, 5/8ths of an inch long, and winged with a grayish brown color.  The edges of the abdomen and the underside of the insect have orange to orange-brown stripes.

Squash bug eggs are really small but are laid in large groups or clusters that are easy to see.  Eggs are reddish in color and are usually laid on the underside of the leaves in the spring.  They hatch out into nymphs in about one to two weeks.  Nymphs are wingless, spiderlike, and often covered by a white powder.  They range in color from mottled white to greenish gray and have black legs.  Later, they begin to turn dark brown and resemble adults.  After molting several times into increasingly larger nymphs, they become adults.  The whole process from egg to adult takes four to six weeks.

An important cultural control is sanitation in the garden.  Remove old curcubit plants as soon as they stop producing and compost them.  Remove garden debris that may allow squash bugs to hide under it, such as boards.  At the end of the gardening season, remove all mulch and compost it or till it under in place to remove overwintering sites for the adult squash bugs. During the gardening season, regularly check under the leaves of curcubits and remove egg masses as soon as they are deposited.

If cultural controls do not suffice to keep squash bugs in check, then you will have to move to chemical controls.  The first line of chemical control is horticultural oils such as neem oil.  You must thoroughly spray the plant, reaching the undersides of each leaf and the crowns of each stem.  The horticultural oils are most effective on nymphs. You can use more toxic chemicals such as permethrin or carbaryl, but these kill beneficial insects and bees and are not really more effective than using the horticultural oils and hand picking the adults off the plants.  When you pick the adults off the plants, drop them in a jar of soapy water to kill them.

Filed Under: Entomology Tagged With: Squash Bugs,

Grasshoppers

May 12, 2014 by stephaniesuesansmith

Grasshoppers by Charles Bohmfalk

Grasshoppers are among the most widespread and damaging pests in Texas. There are about 150 species of grasshoppers in the state, but 90 percent of the damage to crops, gardens, trees and shrubs is caused by just five species.

Grasshoppers cause some damage every year, but they become very destructive during outbreaks. The main factor affecting grasshopper populations is weather. Outbreaks, or exceptionally large populations, are usually preceded by several years of hot, dry summers and warm autumns. Dry weather increases the survival of nymphs and adults. Warm autumns allow grasshoppers more time to feed and lay eggs.  The last several fall seasons were warm and dry, so this year may be especially bad for grasshoppers again in Hunt county and much of the state.

Grasshoppers have many natural enemies that help control their populations. A fungus often kills many grasshoppers when the weather is warm and humid. Another natural enemy is Nosema locustae. Its spores have been incorporated with bran to make insecticide baits. Baits kill some nymphs but almost no adults, though infected adults lay fewer eggs. Baits act too slowly and kill too few grasshoppers to be useful for immediate control.

One way to control grasshopper populations is to eliminate sites where they might deposit eggs.  Grasshoppers prefer undisturbed areas for egg laying, so tilling cropland in mid- to late summer discourages females. Tilling may reduce soil moisture and contribute to erosion, but those disadvantages must be weighed against potential grasshopper damage to the next crop.

Controlling summer weeds in fallow fields has two benefits:  1) Reducing the food supply for nymphs.  2) Reducing the food supply for egg-laying adults.

The following website contains more detailed information on control of grasshoppers and baits:  Grasshoppers and Their Control

The website lists many control products and how to use them.  Always read and follow manufacturer’s directions.

Filed Under: Entomology

Fighting Fire Ants

April 28, 2014 by stephaniesuesansmith

Fighting Fire Ants by Stephanie Suesan Smith, Ph.D.

Fire ants have to be one of the most obnoxious insects in the United States.  Almost everyone who spends any time outside in our area has been stung by them.  They take over gardens, eat okra, blight lawns, and generally make a nuisance of themselves.  The most asked question for Master Gardeners has to be, “How do we get rid of fire ants?”  The answer is the Texas Two Step method of fire ant eradication.

The first step is to spread a bait product all over your yard.  You do this with an old fashion hand cranked fertilizer spreader.  Fill the hopper with bait and walk at a normal speed back and forth across your yard, cranking the spreader as you go.  This will spread enough product out for the ants to find but not enough to hurt birds, pets, or children.  Be sure and cover the whole yard, except for your vegetable garden.  No bait products are labeled for use in a vegetable garden.  The good news is that you can spread the bait around the outside edges of the garden and the ants will travel to it and get it.

Bait works because ants think it is food.  They gather it and bring it back into the colony.  Then they feed it to the queen.  The bait sterilizes her so she can’t lay eggs anymore.  The colony gradually dies as the workers die off.  This takes four to six weeks for the entire colony to die.

The best time to spread the bait is in the early mornings, when it is cooler and the ants are foraging.  Do not spread it during the heat of the day as the ants will not get it before it goes rancid in our heat.  You can spread it in the evening when it is cooler as ants will forage again then.  Make sure any product you spread is fresh or the ants will not eat it.  Even ants reject the rancid fats in old bait.

What if you have a big ant bed in a high traffic area, or in a place where they are stinging kids or pets?  Then you use the second step of the Texas Two Step.  You buy a drench or powder designed to be spread right on the offending bed and use it to kill the most problematic ants quickly.  Most people cannot find all the fire ant beds in their yard so just using drenches or powders to kill fire ants is impractical.  In addition, you cannot use them inside a vegetable garden, so if you have a bed in your vegetable garden you will have to spread bait around the perimeter of your garden for the ants to find.  However, drenches and powders do a good job of killing ant beds that are actively threatening the health and welfare of people or pets by killing the bed quickly and with finality.  Be sure and follow the label directions on all products you use.

Filed Under: Entomology Tagged With: Fire Ants,

  • Go to page 1
  • Go to page 2
  • Go to Next Page »
Find Us on Facebook logo

Articles by Topic:

  • Composting
  • Earth-Kind
  • Entomology
  • Events
  • Flowers
  • Fruits and Nuts
  • Gardening 101
  • Herbs
  • History
  • Keyhole Gardens
  • Ornamentals
  • Plant Diseases
  • Recipes
  • Roses
  • Seeds
  • Square Foot Gardening
  • Trees
  • Turf
  • Vegetables
  • Water Conservation
  • Wildlife
  • Winter

Article Key Words

African Violets Asparagus Bag Worms, Bees Birds, Bluebonnets, Brown Patch, Butterflies, Composting Dragonflies eGardening with the Master Gardeners, Fall Tomatoes, Fire Ants, Fruit Trees Garlic, Gifts, Grapes, Grasshoppers, Greenhouses, Keyhole Gardens Late Fall Vegetables, Late Spring Gardening, Leeks Notable Texas Gardens, Onions, Poison Ivy, Poisonous Plants, Potatoes Propagation Pruning Trees, Rainwater Harvesting, Raised Beds Rose Hips Spider Mites, Spring Vegetable Gardening Squash Bugs, Summer Trees & Shrubs, Turf Grass, Valentines, Vegetables Watering Water Wise Gardening, Wildflowers, Winter
Texas A&M AgriLife Extension Service
Texas A&M University System Member
  • Compact with Texans
  • Privacy and Security
  • Accessibility Policy
  • State Link Policy
  • Statewide Search
  • Veterans Benefits
  • Military Families
  • Risk, Fraud & Misconduct Hotline
  • Texas Homeland Security
  • Texas Veterans Portal
  • Equal Opportunity
  • Open Records/Public Information