• Skip to primary navigation
  • Skip to main content
  • Skip to primary sidebar
  • Texas A&M Forest Service
  • Texas A&M Veterinary Medical Diagnostics Laboratory
  • Texas A&M AgriLife Extension Service
  • Texas A&M AgriLife Research
  • Texas A&M College of Agrculture and Life Sciences
Hunt County Master Gardeners
Hunt County Master GardenersTexas A&M AgriLife Extension Service
  • Menu
  • Home
  • About
    • A History of the Master Gardeners in Texas
    • Outdoor Learning Center
    • Master Gardeners Emeritus
      • Lamont Cunningham – Hunt County
      • Madeline Sullivan – Hunt County
  • The Heritage Garden
    • Bed A – Butterfly Bed
    • Bed B – Earth-Kind Bed
    • Bed C – Sustainable Plant Bed
    • Bed D – Herb Bed
    • Bed E – Vegetable Bed
    • Bed F – Animal Name Bed
    • Beds H & I – North & Northeast Perimeter Beds
    • Bed J – Shadeless Bed
    • Bed K – OLC
    • Bed L – Wildflower Bed
    • Bed M – Rose Bed
    • Heritage Garden Plant Database
  • Events
  • Links
    • Hunt County Extension Office
    • Texas AgriLife Extension Bookstore
    • Aggie Horticulture
    • Aggie Turf
    • Texas Master Gardener
    • Texas Master Gardener Association
    • Texas Master Gardener License Plates
  • Articles
  • Resources
    • Plants for East Texas
    • Vegetable Resources
    • Fruit & Nut Resources
    • Texas Plant Disease Diagnostic Lab
    • Soil, Water and Forage Testing Lab
    • Texas Superstar Plants
    • Earth-Kind Landscaping
    • Insects in the City
    • USDA Plant Hardiness Map
  • CEUs
    • Log My Hours
    • Texas Master Gardener Association Events
    • Master Gardener Advanced Training
    • Earthkind Online Classes
    • American Horticultural Society Events
    • Texas Botanical Gardens and Arboreta

Keyhole Gardens

May 15, 2019 by jhsanger

Keyhole Gardens by John Sanger, Hunt County Master Gardener.

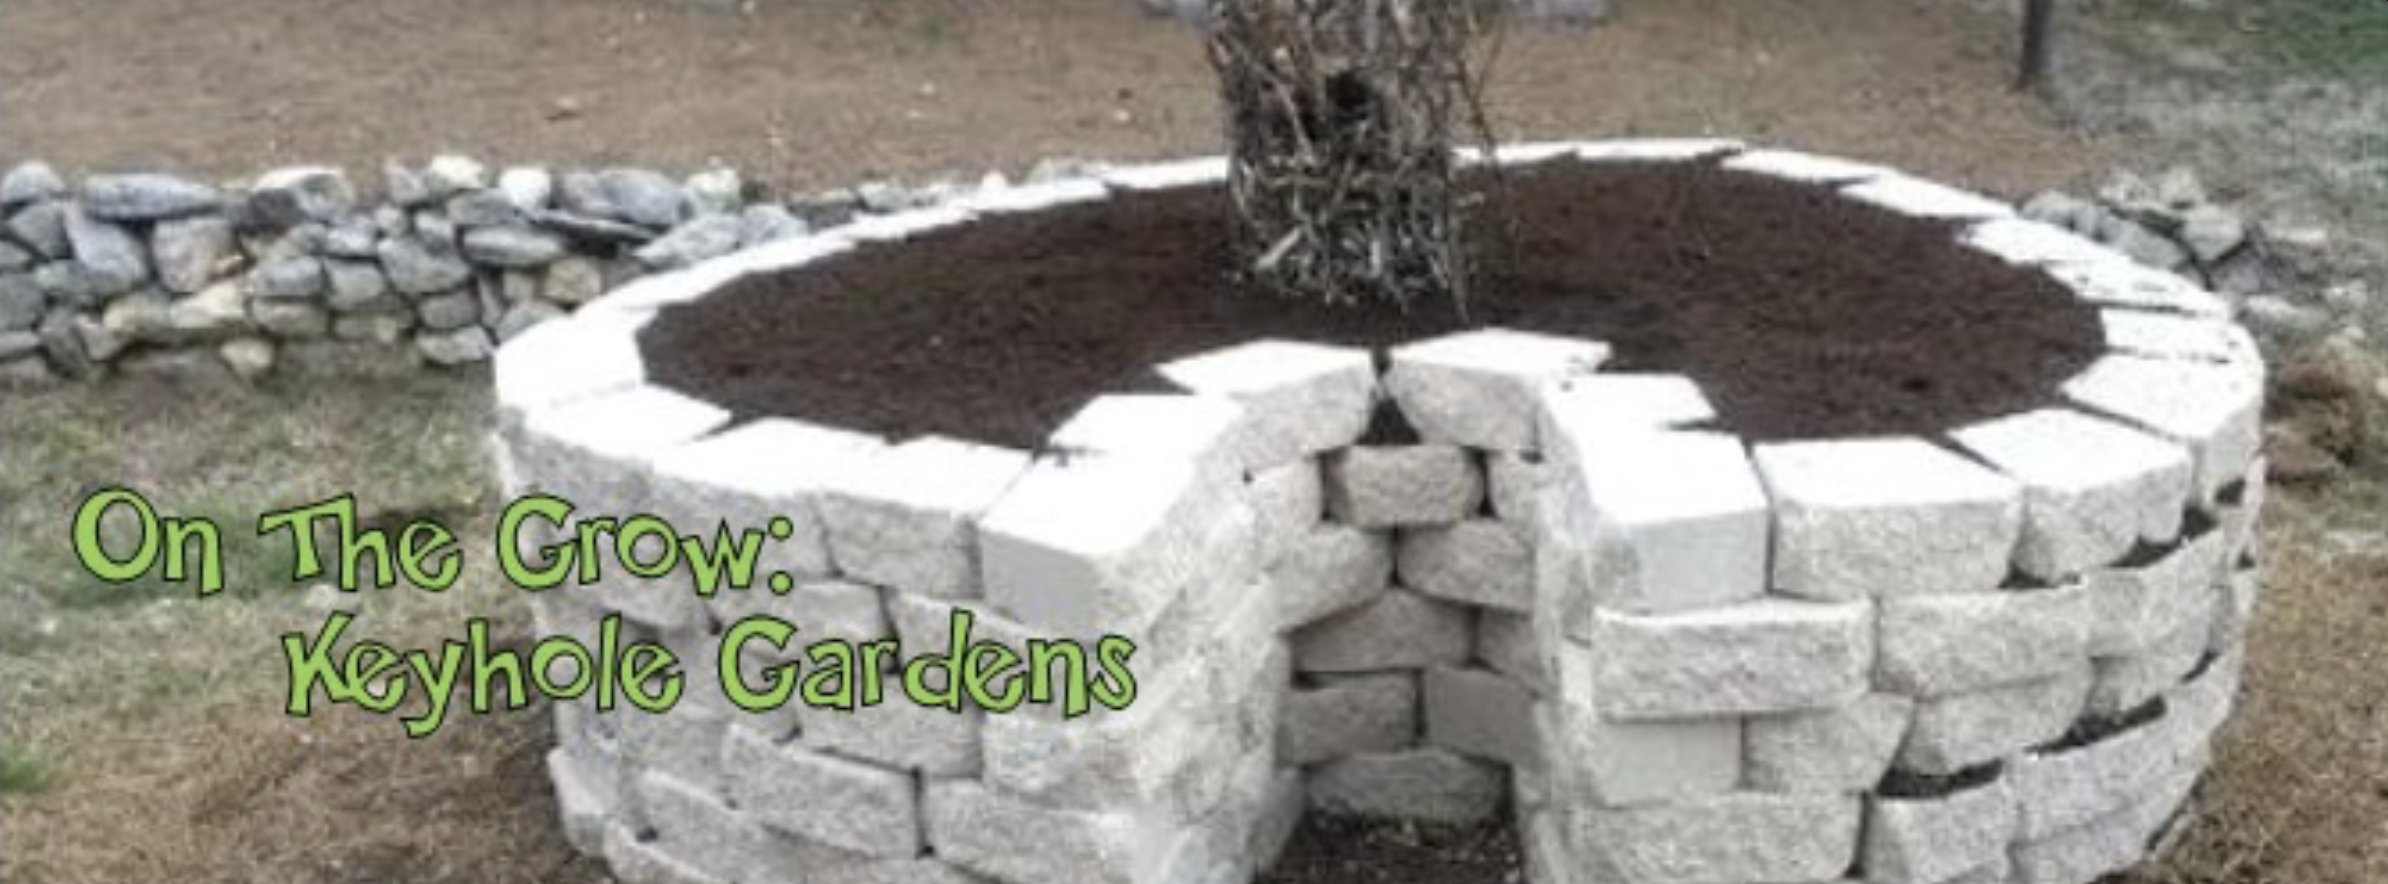
The keyhole garden was developed in sub-Saharan Africa to help people grow food in hot, dry conditions – much like we have here in Texas during the Summer months. It is very efficient at holding moisture and retaining nutrients. The keyhole garden is essentially a round raised bed garden built on a compost pile with a central compost basket. The keyhole is a small aisle on one side of the circular garden that enables the gardener to reach the compost basket to add to it or turn it. It also brings the gardener closer to the center of the bed to reach plants more easily. Keyhole gardens get their name from the appearance of the garden as viewed from above.

The keyhole garden can be made of anything that can contain the soil. The ideal size for maintaining moisture is about 6 feet in diameter. I like the garden walls to be about two feet tall, as I like to tend the garden from a standing position. People use wood beams, cinder blocks, stacked stones, fencing material, even wine bottles and concrete for their garden walls.

To build the garden, lay out a 6-foot diameter circle on the ground. Keep in mind that if you plan to angle your materials inward for strength, you may want to start with a wider base to allow for that angle so that the top of your garden is about 6 feet across. The central compost basket can be a 1-foot diameter cylinder of hardware cloth that will extend about one foot above the final soil level. On my gardens, a 48” wide roll of hardware cloth was the perfect height. Secure the basket with wire and cover the exterior with weed block, burlap, or other permeable fabric. Lay out where you want your keyhole and move your garden wall materials to create an aisle that will allow you to stand near the center of the bed to reach the compost basket.

The keyhole garden should be lined with wet cardboard, and then filled with alternating layers of brown and green compost. Browns include lots more cardboard and dry leaves, and greens can include green, leafy material or manure. Alternate layers until the bed is almost full, then top with a rich planting mix. Plant the bed densely so that the canopy of foliage will shade the soil and then add several inches of mulch around plantings. Put compostable materials into the compost basket regularly. When watering the plants, also water the compost basket so that the water will leach nutrients into the surrounding soil. During the hottest months, some gardeners build a frame so that shade cloth can be hung over the garden.

If you want to maximize crop output in your vegetable garden even during the hottest and driest months, try a keyhole garden. It is a versatile and efficient design which is easy to maintain and can provide a family with a year-round abundance of vegetables.

Filed Under: Gardening 101, Water Conservation Tagged With: Keyhole Gardens, Vegetables

Potatoes and Onions

January 30, 2019 by jhsanger

Potatoes and Onions by Karla Basallaje, Master Gardener.

As you peruse seed catalogs and start to plan your gardens for the upcoming year, remember there are some vegetables you can start planting now. Potatoes and onions are planted at about the same time in our zone with seed potatoes and onion bulbs available for planting now in January and February. Although they are not suited for companion planting they are awesome companions in the kitchen! Whether roasted, baked, sautéed or fried, potatoes and onions make spectacular partners in so many recipes.

The onion variety, short day, which includes the Yellow TX Supersweet 1015, and Red Burgundy, have an average “days to harvest” of 110 days. The conventional wisdom is that the earlier you plant them, the larger they get. The Texas 1015 was developed by Texas A&M University and derives its name for the ideal time to plant the onion seed, which is October 15th, and also for its exceptional sweet taste and its non-tearing properties due to its low pyruvate content (which is what makes you cry when you cut up an onion). However, you can still plant the bulb (small bulbs are called sets) now, January 15th through February 15th. Also in the short day variety are the Early Grano (80 days to harvest) and Crystal Wax (60 days). When planting sets or transplants, they are planted 3/4 inch deep but not more than an inch deep and 3 inches apart.

A seed potato is a potato that is planted to produce a crop. It is the manner in which farmers and growers typically plant potatoes, although it is possible to produce true potato seeds, it is not commonly done. A potato is a tuber, which is the structure the plant uses to store energy to regrow the next season. Potato tubers start to sprout new growth from points called eyes. It is not recommended to use potatoes from the supermarket as seed potatoes because they might not be the right variety for your area and they are not guaranteed virus and disease free. The potato variety best suited to our hardiness zone are the Irish potatoes which include the Yukon Gold (90 days to harvest), Red LaSoda (100 days), Norland red (80 days) and the Caribo (95 days), just to name a few. Potatoes are typically planted by either placing a smaller whole potato directly into the ground or by cutting it up into smaller chunks, making sure that there are at least two healthy “eyes” in each chunk. Soil preparation is important when planting potatoes, working the soil into trenches 10-12 inches high and 36 inches apart. Because tubers grow above the seed piece, it is necessary to add mulch as the potato plant grows to keep it protected from sunlight and to keep the tubers from turning green.

Both vegetables grow best in full sunlight and well-drained soil and benefit from fertilizers early in their growing stage. For more details and information on growing potatoes and onions visit aggie-horticulture.tamu.edu.

Filed Under: Gardening 101 Tagged With: Onions,, Potatoes, Vegetables

Spring Planting

January 23, 2019 by jhsanger

Spring Planting by Wayne Bowman, Master Gardener.

“In the spring I have counted one hundred and thirty-six different kinds of weather inside of four and twenty hours.” ~ Mark Twain

Aside from the effects of Brother Clement’s weather, it’s never too early to plan this year’s garden. In our part of the country, we’re somewhere around six to eight weeks from the average date of the last frost. Note, I said AVERAGE! Last frost dates jump around like a cat on a hot stove. Last frosts have occured as early as mid February or as late as April, both extremely rare, but they do happen. Best guess is to expect a frost 50% of the time after a published average date, so be careful planting tender crops such as tomatoes, beans, etc. Be prepared to cover some crops with frost cloth, etc., even if you use the following planting guide:

https://dallas-tx.tamu.edu/files/2010/06/Vegetable-Planting-Guide.pdf

The same chart I just referenced also makes note of the optimum soil tempreature for planting. If you wish, you could buy a soil thermometer, but (secret hint!) a probe type meat thermometer works well, too.

I’ve made a few quick trips through the Big Box and Ranch stores, and they’ve replenished their displays with seed marked for this coming season. Seed potatoes and onions are awaiting your purchase, too. They’ll be going into the ground shortly. Don’t try to use those potatoes sprouting in your pantry, though. Most have been treated with a chemical that retards growth.

Seeds left over from last year? Are you wondering if they’re still useable? It is easy enough to see if they’re still viable. Place a number of seeds between two pieces of damp toweling. Check every few days to see if anything is sprouting while keeping the toweling damp. A week to ten days later count the sprouting seeds and use this as a guide as to the percentage of good seed you have. Of course, most seed is rather cheap.

Ordering seeds? Time is short, although on-line ordering speeds shipment greatly. One caution should be to make sure the seed you are ordering is for something that will grow well in our climate. While our season is plenty long, some won’t do well in the heat of summer. If you are wondering, ask your local Master Gardener Vegetable Specialist. If they don’t know about a specific variety, they’ll know where to find the information.

Remember that garden plan I told you to make last fall? Now’s the time to drag it out and see what and where you wish to plant. Check your tools and sharpen your blades. In a few weeks, you’ll be wanting to test the motors on your mower, tiller and anything mechanical you might use, to see that they’re in top operating condition. New air filters and spark plugs do wonders sometimes. The busy season is just around the corner.

“Indoors or out, no one relaxes in March, that month of wind and taxes, the wind will presently disappear, the taxes last us all the year.” ~Ogden Nash

Filed Under: Gardening 101, Seeds Tagged With: Spring Vegetable Gardening, Vegetables

Cover Crop

November 28, 2018 by jhsanger

Cover Crop by Wayne Bowman, Master Gardener.

In an earlier column, I wrote about putting the garden to rest for the season using compost and mulch. An alternative to that method is the use of a winter cover crop. Many of you might consider cover crops to be something only used in commercial fields after the harvest of the cash crop, but there are benefits to be had for the smaller garden, too. After your harvest, cover crops can nourish your garden, protect it against erosion and weeds, and loosen the soil.

Cover crops can be listed in two categories, Legumes and Non-Legumes. All, however, provide the previous benefits, but in varying degrees.

Legumes, red clover, hairy vetch, field peas, and others are great for fixing atmospheric nitrogen for use by subsequent crops. Lower carbon and higher nitrogen in cover crops promote a faster breakdown in the soil. While they release the needed nitrogen faster, legumes provide less weed control and add less organic matter to the soil.

Non-Legumes– rye grass, winter rye (which is actually a grain), wheat, and oats all produce significant biomass, soil conditioning, and excellent weed and erosion control. Due to their higher carbon residue, they do take longer to break down in the soil, so nutrients that they scavenge from the soil will not be available to your next crop as quickly. The advantage of the slower decomposition comes in the form of the increase in soil organic matter.

A good cover crop sends roots deep into the soil. After the plant decomposes, this loosens the soil, providing pathways for moisture and air to your plantings. The dense top growth crowds out weeds, and in the case of non-legumes, competes with the weeds for nutrients. Some of the non-legumes also produce allelochemicals, which are natural herbicides. While these don’t affect all plants, it’s best to allow the roots of them to decay for a couple of weeks before planting.

Green Manure isn’t what you’ll find in the bottom of an alien spacecraft, rather it’s the term for a cover crop used to further nourish the soil. Used in various ways, the crop may be cut down while green and tilled in, cut and left to lay as mulch, or allowed to die and decompose in place. A drawback to allowing it a natural death is that plants will normally seed before the end of their life cycle. This gives it the potential to become a weed instead of a benefit to your garden. For this reason, most cover crops are cut before they mature.

Leaving the dead stubble and top growth in place allows no-till gardeners to plant directly into the covered areas by opening planting holes in which to place transplants. A small trench dug through the cover accommodates row crops.

Better moisture and heat control, decreased compaction and increased nutrients are all benefits and reasons why the next time your harvest is complete, you should try a cover crop.

Filed Under: Gardening 101

Winterizing Your Garden

November 7, 2018 by jhsanger

Winterizing Your Garden by Wayne Bowman, Master Gardener.

Thalassa Cruso reminds us that “Fall is not the end of the gardening year; it is the start of next year’s growing season.” By the time you read this, it’s likely that we’ve already experienced our first frost in North Texas. Time to turn out the lights in the garden; summer’s party is over. You’ve coaxed the final tomato from the vine and your neighbors and relatives no longer smile when you say the word “squash”. An excellent time to get ready for next year.

Unless you’ve a perfect memory (and I don’t), it’s a good time to make a simple diagram of what you planted where this year. Doing so will simplify planning nest year’s layout of the garden and allow you to do some crop rotation. Changing the layout of your plantings helps avoid disease in your plants, balances soil nutrients, and decreases insect pests.

Garden cleanup is pretty simple – pull all the dead and dying plants, throw them into the compost pile, and go watch the Cowboys win another game, right? WHOA, partner! You might be heaping this year’s problems on next year’s plants. Fungus, disease, and insects that can winter over might be holding on to those dead plants. While a hot compost pile will kill off some fungus spores, disease viruses, and insect eggs, not all compost piles heat up enough to do the trick – so next season you might be enjoying the same issues you fought this year. Those few plants you pulled won’t fill the compost bin, so it’s better to send them to the burn pile, or off to the landfill.

Tomato towers, stakes you’ll use next year, and trellis material will need to be removed, cleaned and stored. If you did have disease issues with some of the plants that used these structures, a little spritz of bleach water while cleaning them off should prevent a repeat performance of the problem. Sometimes a little work at prevention pays great benefits.

The lawn’s still growing some, so you’ll still need to mow a time or two – but those leaves on the grass will need to go. Left on the lawn, they’ll encourage disease and give insects a place to hide from the cold. Resist the urge to sack them up and send them to the dump. Use a bagging mower or a good rake and you’ll have the material for a nice blanket for your garden’s winter nap.

To till or not to till, that is the question. If you’re practicing no-till gardening, then it’s an excellent time to apply a thick layer of mulch and compost. If you’re a tiller like me, it’s time to till and then apply that thick layer of mulch and compost. Over the resting season (I hate to say winter), the organic material will decompose and filter down into the soil. This will also give the organics a chance to “marry,” or activate in the soil– something that takes time. Those leaves I mentioned earlier can now be spread out on the garden as well, helping to amend the clay. In either case, till or no till, the mulch/compost will add nutrients to the soil, making it easier to work in the spring. An alternative to some of these preparations is to plant a cover crop, which will be discussed in a future article.

A few hours on a Saturday spent putting your garden into a proper seasonal rest will pay huge benefits come next spring. Increased soil nutrients, better friability, and moisture content all set the stage for another great year in the garden. Plus, the game’s not on until Sunday.

Filed Under: Gardening 101 Tagged With: Composting, Vegetables, Winter

Winter Planting of Onions, Garlic and Leeks

October 30, 2018 by jhsanger

Winter Planting of Onions, Garlic and Leeks by Byron Chitwood, Master Gardener

Although onions, garlic and leeks have been around for a long time, it is not really known where they originated. Archaeologists have found evidence that they have been used as a food source through cultivation for at least 7,000 years. No doubt, the early hunter-gatherers foraged for them in the wild along with anything else growing wild that could be eaten. The earliest evidence of domestication and cultivation has been found in China, Asia and Persia.

The first European settlers to the Americas brought seeds with them. However, they found that the Native Americans were already using them as a food source. They probably cooked or ate them raw with the vegetables they were already cultivating such as corn, beans, squash, tomatoes and potatoes.

For the home gardener, there are many varieties of onions available for cultivation in their garden plot. Onions come in three basic colors: white, red and yellow or brown. They can readily be cultivated from seeds, transplanted using “sets” or from small bulbs that are grown for the specific purpose of gardening.

If you are going to start onions from seeds, now is the time to plant them for a spring garden they will overwinter just fine. They will get an early start towards forming bulbs. Onions need to be planted in a fertile and well drained area with as much full sunshine as possible. Rather than starting onions from seeds, most home gardeners buy small plants or sets that come in bundles of fifty to one hundred individual sets. Since there are many varieties available, choose several different ones to diversify your garden and tastes. White and yellow varieties seem to do the best in our area. As the sets take root and begin to grow, a few can be eaten as “green” onions or scallions. As the days grow longer, the onion sets will begin to form bulbs and immature bulbs can be some of the best eating. Onions are ready to harvest when the green tops begin to fall over. They should be harvested and stored in a cool and dry area. Some varieties keep better than others.

Garlic and Leeks should be planted in October for harvest in mid June. Garlic can be purchased from any major seed and garden supplier. Garlic comes in bulbs made up of from 9 to twenty cloves. Carefully separate the cloves from the bulbs and plant these individual cloves about 4-6 inches apart. They should be planted with the root end down and the sharp end up. Like onions, garlic is ready to harvest when the tops begin to turn yellow and topple over.

The worldwide production of onions is about 100 million tons with china producing about 25% of the total and India not far behind. By comparison, U.S. production is about 3 million tons. If my arithmetic is right, that is about 20 pounds of onions per year for every man, woman and child in the U.S. The Chinese eat about 33 pounds per person. Can one suppose that the demand for breath fresheners will grow at the same rate as the consumption of onions and garlic?

Filed Under: Gardening 101 Tagged With: Garlic,, Leeks, Onions,, Vegetables, Winter

Planting Garlic

October 11, 2018 by jhsanger

Planting Garlic by Karla Basallaje, Hunt County Master Gardener.

Garlic (Allium Sativum), is in the amaryllis family and is native to central Asia. There are two types of garlic, the hardneck variety (the bolting type) and the softneck variety (the non-bolting type). Bolting refers to the production of a flower stalk and bulbil, in this case. Garlic is considered by many, as an easy crop to grow; however, it is best to remember the basics: know your soil, your climate and location.

Choose a sunny spot to grow your garlic, most growers prefer full sun; however, partial sun is ok too especially if you are trying to grow hardneck varieties that grow better in cooler temperatures choosing partial shade during the hottest time of the day. Garlic needs well-draining, friable soil. It will not grow in soggy or compacted soil, as the bulbs will either rot or not grow very large. Consider growing your garlic in raised beds, amend by adding organic matter such as humus, manure, and compost –mix it in thoroughly until the soil is light and fluffy. In this area of Texas, the softneck or non-bolting varieties are more commonly grown as they do better in warmer climates. Some of the more common softneck varieties are: California Early, California Late Silverwhite, Inchelium red and Italian Loiacono. Softnecks store better, up to 9-12 months if cured and stored properly, and the bulbs are generally larger. It is best to purchase your planting garlic from a garlic farm or quality online source. Grocery store garlic may not be suited to our area and they are sometimes sprayed with chemicals to inhibit growth.

A good time to plant your garlic is in mid October; however, you can plant up until December. When your beds are ready, crack the heads of the garlic open and plant each clove leaving their papery covering intact. The clove is generally planted 2 to 6 inches deep. The deeper the clove is planted, the cooler it will keep. It is probably a good idea if you are experimenting with hardneck varieties to plant it at about 6 inches deep. Plant 6 inches apart with the pointed side up and the root end down. Plant only the largest cloves so that the cloves in your bulb have the best chance to be at least as large as the clove you are planting. Each clove will grow into a garlic bulb. After planting be sure to mulch with straw or shredded leaves about 2 inches.
The goal is to have the garlic plant develop big healthy leaves, the larger the plant, the larger the bulb. You want to grow the bulb for as long as possible before it starts to mature. Water about 1-2 inches a week; stop watering two weeks before harvest.

Harvest takes place in the summer about June or July when the leaves turn yellow and you have about 50% dieback of the leaves. Carefully pull out the garlic heads and although they may be eaten right away, most growers will cure the garlic hanging them upside down in a cool, well-ventilated area for at least two weeks. Trim the stalks and the roots and store in a cool place. Be sure to visit Texas A&M horticultural websites for more information.

Filed Under: Gardening 101, Herbs Tagged With: Garlic,, Vegetables

Landscape Trees

September 26, 2018 by jhsanger

Landscape Trees by Karla Basallaje, Master Gardener

“I think that I shall never see a poem lovely as a tree.” No doubt you have read or previously heard this famous couplet by Joyce Kilmer, and without waxing too poetic, or straying too far off topic, I agree with the poet’s sentiment. Trees are spectacular plants offering a wide range of size, color, shape and function, making them a great addition to any landscape design.

Before choosing a landscape tree, determine your soil’s drainage and water holding capacity by conducting a “hole-test”. First dig a hole 6-8 inches wide and 2 feet deep. Fill the hole with water and allow the water to saturate and drain. Fill the hole again only this time halfway and make note of the time. Monitor how long it takes for the water to drain from the hole: 15 minutes – excessive drainage; 15-30 minutes – adequate drainage; more than 30 minutes – poor drainage. Use these guidelines to make decisions and to make modifications. Visit the aggie horticulture website for more ideas and solutions.

A little bit of research before deciding on a landscape tree will save you time and money. Trees are most definitely a long-term investment. Choose a tree that is suited to your climate, soil, and available space. Texas A&M Agrilife has designated hardy, reliable, disease-resistant plants with the Texas Superstar designation. Currently there are six trees designated Texas Superstar trees which include: Basham’s Party Pink Crapemyrtle; Deciduous Holly; Shantung Maple; Lacey Oak; Chinkapin Oak; and Chinese Pistache, visit texassuperstar.com to learn more about these trees and other Texas superstar plants. If you are looking for a wider range of choices visit the Texas Tree Planting guide website at texastreeplanting.tamu.edu and you can customize your choices with the tree selector option.

Once you have selected a tree, it is time to plant it. Fall is a great time to plant your tree when the temperatures are milder. Remove the tree from its container and dig a hole that is 2 to 3 times the width of the rootball (a wide hole allows ample drainage for the roots), make sure that the depth of the hole is 1-2 inches shallower than the rootball. In other words, the top of the ball should be sticking out at least an inch. Loosen outside roots from the ball and remove excess soil from the top and water it thoroughly. Place the tree in the hole (most experts agree that there is no need for staking as it might damage the bark) backfill with just the soil that was dug up from the hole but before the backfill is complete, water it in, then complete the backfill. Continue to water it in thoroughly and mulch. Make sure that only a thin layer of mulch is near the trunk, saving the thicker layer of mulch for the outside edge. Fertilizers are not recommended until the tree has had an opportunity to become established, which is about 6-8 months. For more helpful ideas visit the Texas A&M horticulture websites.

Filed Under: Gardening 101, Trees Tagged With: Trees & Shrubs,

Compost vs Mulch

September 12, 2018 by jhsanger

Compost vs Mulch by Wayne Bowman, Master Gardener.

Not all mulch is compost, but all compost can be used as mulch. To be clear, the terms are not interchangeable. Unlike compost, some forms of mulch will never decompose– such as shredded rubber tires. Various woods are slow to decompose– like cypress or redwood. This doesn’t mean they are bad mulch products– they still keep the soil moist and at a lower temperature– but they’ll not turn into quickly useable compost. Another way to distinguish between the two is to remember that mulch goes ON the soil, while compost goes IN the soil.

Here in North Texas, the soils vary from sandy to heavy clay. Sandy soil drains well– sometimes too well– and often lacks nutrients. The heavy clay is nutrient rich, but it doesn’t drain well and turns into bricks when it dries. In both cases, compost comes to the rescue.

There are two ways decomposition occurs: anaerobic (without air), and aerobic (with air). Anaerobic occurs when organics are placed in an airless environment, like at the bottom of a pit dug in the ground and then covered with dirt. I’m going to concentrate on the aerobic method.

An aerobic compost pile is a combination of “green” and “brown” materials in the proper ratio– four parts brown to one part green. Greens provide the nitrogen that feeds the microbes; browns provide carbon for energy.

Green material includes fresh grass clippings (to be used sparingly), vegetable scraps from the kitchen, and pretty much any recently living plant material. Manure is considered “green” also, but care should be taken to make sure it comes from grass eaters only, not meat eaters. Meat scraps and pet manure are no-no’s in the compost pile. Resist the urge to take your old plants from your garden to compost, too. You could be transferring disease which will infect your garden next year. Old plants deserve cremation or a proper burial in the landfill. Likewise, avoid grass clippings from a lawn that has been treated with herbicide, or weed and feed.

Browns include dried leaves, wood chips, hay, etc. In addition to carbon, the browns add bulk to the compost.

Properly mixed, the pile should begin to heat up, indicating decomposition; if it doesn’t, add greens. If it smells, add more browns. You can add a sprinkle of high nitrogen fertilizer while alternating the greens and browns during the build and turning. Add some water if the pile seems to be drying out. Expect the pile to decrease in size during the process– you’ll have room to add more fresh material. When to turn the pile depends on how much time you wish to allot to the task. The more frequent the turn, the faster the compost finishes. If you’re in a hurry, turn as often as every three days. If not, a week to ten should work.

There are many options in building the physical container for your pile. I built three side-by-side bins, keeping two full of working compost and transferring the pile to the third during the turn. The most important factors to keep in mind in designing your container are building it large enough for your needs and ensuring air circulation to the pile.

A healthy compost pile will also be home to a few critters. Earthworms love coffee grounds, and help the microbes turn your kitchen waste into garden gold. Insects like pill bugs and soldier flies also make quick work of the decomposition. All that’s needed are scraps and moisture to excite them to come to your buffet.

After several weeks of regular turning, you’ll dig into your compost pile to find that it’s no longer generating heat, but instead has a nice granular brown appearance and a great earthy smell. Any resemblance to grass, chips, etc is gone. It’s finished and ready to head for the garden or flower bed to begin feeding your plants and amending your soil.

Filed Under: Gardening 101 Tagged With: Composting

Making Garden Decor

August 21, 2018 by jhsanger

Making Garden Decor by June Morgan, Master Gardener.

A beautifully planted garden often has whimsical, useful, or comforting additions to grace its landscape.  Unfortunately, many store-bought items, especially those made of concrete, are very expensive.  The do-it-yourselfer does not have to be an artist in order to make striking sculptural decor out of concrete. Hundreds of different shapes can be made with this medium, such as spheres and leaves of all sizes which can be used for projects such as fountains, stepping stones, and wire sculptures.

Molds for stepping stones can be made of almost anything – aluminum pie plates, pizza boxes, or cardboard cut to desired shapes.  Large leaves such as elephant ears can even be used as the final shape of stepping stones.  The grocery is a rich source for deep-veined leaves for a good impression.  Using sand for the base, place the leaf with vein side up, cover with plastic wrap, then spread the wet concrete mix to cover the leaf.  Plan for at least 3/8” inches thick for lasting strength.  After several days, flip the leaf carefully and smooth any rough spots with a wire brush.

Concrete spheres of all sizes and transformations are interesting additions to the garden.  Solid balls are surprisingly easy to make and can be used to nest among the plantings or as part of another assembly.  There are essentially two methods of making them with molds of disposable glass globes from thrift stores or garage sales, and balloons or beach balls. After placing the globe on a sturdy base such as a bucket, fill the interior with the concrete mix, making sure to level it at the opening.  After it is hardened, place it in a plastic garbage bag and tie the opening.  Then, taking a hammer and wearing gloves, crack the globe all around with just enough force to release the glass from the concrete.  Pry off the remaining shards, keeping them in the bag.  The resulting surface can be rough or smooth depending upon the amendments to the wet mix, such as peat moss.

Another type of orb is not solid but a see-through sphere.  Place an inflated balloon or beach ball onto a sturdy bucket or tripod.  Cut fluffy yarn, heavy string or even polar fleece into lengths to go around, over, and under.  Dip them into the concrete mix and drape them in no particular design onto the sphere, some touching, some not.  When set, deflate the balloon or beach ball (of course the valve has been left available).  When working with concrete, old clothes, rubber gloves, and a dust mask are givens.

For more details about concrete projects, go to Pinterest on the internet where you will find information about the types of mixes for different projects, coloring instructions, and many photos and videos to inspire your garden planning.

Filed Under: Gardening 101

  • Page 1
  • Page 2
  • Page 3
  • Interim pages omitted …
  • Page 6
  • Go to Next Page »
Find Us on Facebook logo

Articles by Topic:

  • Composting
  • Earth-Kind
  • Entomology
  • Events
  • Flowers
  • Fruits and Nuts
  • Gardening 101
  • Herbs
  • History
  • Keyhole Gardens
  • Ornamentals
  • Plant Diseases
  • Recipes
  • Roses
  • Seeds
  • Square Foot Gardening
  • Trees
  • Turf
  • Vegetables
  • Water Conservation
  • Wildlife
  • Winter

Article Key Words

African Violets Asparagus Bag Worms, Bees Birds, Bluebonnets, Brown Patch, Butterflies, Composting Dragonflies eGardening with the Master Gardeners, Fall Tomatoes, Fire Ants, Fruit Trees Garlic, Gifts, Grapes, Grasshoppers, Greenhouses, Keyhole Gardens Late Fall Vegetables, Late Spring Gardening, Leeks Notable Texas Gardens, Onions, Poison Ivy, Poisonous Plants, Potatoes Propagation Pruning Trees, Rainwater Harvesting, Raised Beds Rose Hips Spider Mites, Spring Vegetable Gardening Squash Bugs, Summer Trees & Shrubs, Turf Grass, Valentines, Vegetables Watering Water Wise Gardening, Wildflowers, Winter
Texas A&M AgriLife Extension Service
Texas A&M University System Member
  • Compact with Texans
  • Privacy and Security
  • Accessibility Policy
  • State Link Policy
  • Statewide Search
  • Veterans Benefits
  • Military Families
  • Risk, Fraud & Misconduct Hotline
  • Texas Homeland Security
  • Texas Veterans Portal
  • Equal Opportunity
  • Open Records/Public Information