• Skip to primary navigation
  • Skip to main content
  • Skip to primary sidebar
  • Texas A&M Forest Service
  • Texas A&M Veterinary Medical Diagnostics Laboratory
  • Texas A&M AgriLife Extension Service
  • Texas A&M AgriLife Research
  • Texas A&M College of Agrculture and Life Sciences
Hunt County Master Gardeners
Hunt County Master GardenersTexas A&M AgriLife Extension Service
  • Menu
  • Home
  • About
    • A History of the Master Gardeners in Texas
    • Outdoor Learning Center
    • Master Gardeners Emeritus
      • Lamont Cunningham – Hunt County
      • Madeline Sullivan – Hunt County
  • The Heritage Garden
    • Bed A – Butterfly Bed
    • Bed B – Earth-Kind Bed
    • Bed C – Sustainable Plant Bed
    • Bed D – Herb Bed
    • Bed E – Vegetable Bed
    • Bed F – Animal Name Bed
    • Beds H & I – North & Northeast Perimeter Beds
    • Bed J – Shadeless Bed
    • Bed K – OLC
    • Bed L – Wildflower Bed
    • Bed M – Rose Bed
    • Heritage Garden Plant Database
  • Events
  • Links
    • Hunt County Extension Office
    • Texas AgriLife Extension Bookstore
    • Aggie Horticulture
    • Aggie Turf
    • Texas Master Gardener
    • Texas Master Gardener Association
    • Texas Master Gardener License Plates
  • Articles
  • Resources
    • Plants for East Texas
    • Vegetable Resources
    • Fruit & Nut Resources
    • Texas Plant Disease Diagnostic Lab
    • Soil, Water and Forage Testing Lab
    • Texas Superstar Plants
    • Earth-Kind Landscaping
    • Insects in the City
    • USDA Plant Hardiness Map
  • CEUs
    • Log My Hours
    • Texas Master Gardener Association Events
    • Master Gardener Advanced Training
    • Earthkind Online Classes
    • American Horticultural Society Events
    • Texas Botanical Gardens and Arboreta

Water Efficient Gardening

May 9, 2018 by jhsanger

Water Efficient Gardening by Wayne Bowman, Master Gardener.

There’s one constant fact of gardening: If it grows, it needs water. This includes the garden you call your lawn, your flower beds, and that patch where you struggle to grow a few edible vegetables.

In case you haven’t noticed, Northeast Texas is booming, and there’s no end in sight. A critical issue for now and in the future is maintaining an adequate supply of quality water. The pressure on an already limited supply is increasing with the population. Other issues with which we Texans must contend are dry summers and occasional drought. Sometimes we have sufficient water; sometimes we don’t– so we best take care of what we have.

We’re all in this together, so what can we do to help?  Plan for the demand. You don’t need to turn your lawn into a rock garden filled with cactus, or a concrete slab. Choosing the right turfgrass for our climate and soil will make better use of landscape water. Bermuda, St. Augustine, and Zoysia are all suitable for our climate, requiring low to moderate amounts of water. If you have an area where there is little traffic, Buffalo grass is excellent and requires the least care and hydration.

Nearly 25% of urban water usage is attributed to lawn irrigation. I’m sure you’ve seen someone watering the street with a poorly planned system or irrigating during a driving rain. Many urban areas now limit the number of days lawn watering is allowed. Just because it’s “your day” to water, doesn’t mean your lawn is thirsty. Using a “cycle and soak” method prevents most runoff by watering for a shorter period of time, then allowing a period for the water to soak into the soil, followed by another, or several, cycles and soaks. If you haven’t already, consider adding to your system a soil moisture monitor that will only allow the system to activate if the soil needs a drink, and a rainfall monitor to stop watering when the heavens are doing the irrigation. Your watering cycles should be set for the early morning (4:00-6:00 am), to take advantage of better water pressure, lower wind, and less evaporation caused by the sun. Aerifying (plugging) your turf will help moisture get to the root systems, making more efficient use of both fertilizer and water. Don’t forget to monitor the system for leaks, etc. Unchecked leaks waste huge amounts of water.

In the garden and flower beds, drip irrigation allows a more precision watering system. Properly designed and installed, it delivers a slow and deep watering to the root zones of your plantings, reducing water loss through evaporation.

Properly conditioning your soil, for both turf and garden, will contribute to the best use of water. A soil test should be considered a must before you plant. Organic amendments will help the clay soils of Northeast Texas better absorb water and nutrients. The benefits of using mulch cannot be stressed enough. A 2-6 inch layer of mulch will protect the soil in your garden from drying out, preventing the baking effects of sun and wind. Layering mulch over a drip irrigation system will make your watering more efficient.  Instead of bagging lawn clippings, consider leaving them on the lawn to return nutrients to the soil. A mulching lawnmower and more frequent mowing benefits your lawn and prevents beneficial clippings from wasting away in a landfill.

Choose your plantings wisely, taking into consideration the amount of time you wish to spend tending them and how well they are adapted to our climate.  Check with your local certified nursery professional about Texas Superstar plants that have been tested under “Texas conditions.” Visit TexasSuperstar.com for more details.  Proper planning, maintaining your irrigation system, mulching, and choosing the right plantings add up to a better lawn and garden, while saving a natural resource and your water bill.
Filed Under: Gardening 101, Water Conservation Tagged With: Watering

Hanging Baskets

April 25, 2018 by jhsanger

Hanging Baskets by June Morgan, Master Gardener.

Hanging baskets can add much to the outdoor porch and deck summer decor, but it can be a challenge to keep them looking their best. Proper siting, basket design and proper watering are key elements of good management.

The best setting is a protected area which allows sunlight from above or the sides such as a deck canopy out of the strong winds which will tear the plants apart.  In contrast to the ordinary solid plastic container, the larger mesh basket is the most visually effective while also holding the most soil and plants. Also, coco fiber or sphagnum moss looks more natural when viewed from below. Coco fiber is a natural insulator against the heat and helps to keep the soil evenly supported inside the fiber liner. Some ambitious gardeners have their baskets made to order from a metal shop using special ornamental effects.

To set up a basket from scratch, start with a fiber layer, then a plastic sheet with holes in the bottom. Add a soil-free potting mix that includes water holding crystals, then add a slow-release fertilizer. If using sphagnum moss soak it overnight before using. Now, one can get creative with plants. Try an upward growing plant such as coleus and surround it with a vine such as one of the many ivies or trailing pelargoniums. Further plant additions can be made by wrapping roots in paper for protection while slipping them through side slits into the potting mixture.

Watering baskets is more challenging than for ground plants. Quite often, using a hose will simply result in water immediately running out of the bottom. One solution is to soak the whole basket in a container such as a wash tub of water for several hours or even overnight. Another is to fill a large pan of ice and dump it into the basket, ensuring a slow melt of water. To care for your baskets during the season, deadhead the flowers, fertilize once a week and keep watered.

Beyond the run-of-the-mill baskets available in big box stores, check out the uncommon local nurseries, seed catalogs, the internet (google hanging baskets), and wherever herbs and tomatoes are available as possible basket material. So, don’t settle for just the common offerings. Put together your own combinations to bedazzle the eye!

Filed Under: Flowers, Gardening 101, Ornamentals

Raised Bed Gardening

March 28, 2018 by jhsanger

Raised Bed Gardening by Wayne Bowman,  Master Gardener.

Spring; time to look ahead to planting, growing, and eating our own fresh vegetables.  So, you thought you’d try your hand at raised beds, since you don’t have loads of space.  Great!  First, though, you’ll need to build it, and planning is the key.

When planning your raised beds, placement, materials, size, and use must all be considered.

Placement:  Just about any nearly flat surface is good.  For many, however, there’s another consideration; the Home Owner Association.  If you live in a developed community or an urban setting, it might mean your HOA has restrictions on where and what you might build or grow.  City zoning restrictions may apply too.   It’s best to check before you buy the lumber, or you may be paying for more than just the nails.

Materials:  This is subject where you can be quite creative.   A neighbor uses several stock troughs for his.   My wife used hay bales, which lasted a few years.  When the bales rotted they became a great amendment to our black soil.   Bricks, concrete blocks, or anything that will contain soil are all useable.   The bed can also be purchased in kit form, ranging in price from around $50.00 to several hundred.  By far the most common is the do-it-yourself wooden bed, but I’ve seen pre-fab beds in metal too.

Choose something that is rot and insect resistant.   Cedar is a good choice but expensive.  Preservatives in treated lumber have changed and are no longer as toxic to humans as they once were.  Use the type rated for ground contact.  If you still have concerns about the chemicals, as some do, a plastic liner or coating the wood with a sealer will prevent most chemicals from leaching into your soil.   Under no circumstances should you use old railroad ties.   They’re great for retaining walls or lining driveways, but still retain a lot of the preservative creosote, which is both toxic and corrosive.  Never a good combination.

Size:  This depends on how far you can comfortably reach and your available space.  You’ll want to make sure you can reach the center of the bed without stepping into it.  Consider, too, if your kids will be helping you and size the width of the bed so it’s within their reach.  Two 8 ft 2×10’s can frame a 4 ft by 4 ft bed nicely.  If you’re thinking bigger and have the room, go longer, rather than wider. How high the bed is raised should be considered.  For those of us who are a bit more advanced in age, the bed can also be built on legs, eliminating bending and stooping.

Use:  Wow! This is a subject that would take a book to cover.  In fact, there are many that do.  Done carefully, even corn can be grown.  I would shy away from plants such as pumpkins.  My wife did this one year and it overgrew the bed, far into the lawn!  My best advice is to grow what you like to eat or look at.

Happy gardening!

Filed Under: Gardening 101 Tagged With: Raised Beds, Vegetables

Water Wise Ways

June 10, 2015 by stephaniesuesansmith

Water Wise Ways by Byron Chitwood

We are currently out of the woods on water supply and soil moisture compared to what we have been through in the past.  However, knowing Texas and the hot summers, there is no time to conserve like the present.  We might need to do that in the present.

First of all some facts are that agriculture and water management are a global issue.  The population is increasing while the supply of water worldwide remains about stable.  Less than 3% of the world’s water is considered fresh which includes all water with less than 500 ppm so dissolved salts.  97% of the world’s water is ocean.  The world’s fresh water as a percentage of total water is: glaciers, ice caps and snow account for about 2%; ground water and soil moisture is about 1%; swamps and rivers are about 0.01 percent and the atmosphere is about 0.04%

Human needs range from about 11 to 53 gallons per day per person while farm animal require from 2 to 15 gallons per day per animal.  Minimum crop needs in our area require a minimum of 25 inches of rain per crop year.  May was an exceptional good month for rain in our area.  After the soil became saturated, the rest ran off and filled the lakes.  I remember when I was a kid, the Guthrie city lake went dry and the only water we had for all needs was well or cistern water, neither of which was plentiful enough for all our needs or wants.  A pipe line was laid from the Cottonwood Creek and the water sure didn’t taste good but it was wet.

I mentioned cistern water in the previous paragraph.  Nothing is new about that.  The first source of water for the early settlers was creeks or springs until they were able to hand dig a well.  The well water wasn’t always good.  My granddad’s first farm had a hand dug well and the water was “gypy” and not good for human consumption.  I suspect the water was slightly salty since the farm was less than a mile away from the Cimarron River which was highly salty. The cows, horses, hogs and chickens didn’t seem to mind it but they didn’t have much of a choice.  After farm homes and barns were built, the farmers constructed cisterns most of which were concrete lined and underground.  The pumps were hand cranked and had a multitude of small buckets attached to a chain and emptied into a catch device that delivered the water to an outlet.  To be on the safe side, cistern water needed to be boiled since the cisterns were not mosquito or critter proof.

If you are interested in constructing a cistern or “rain water harvesting system” you can obtain plans at the Hunt County AgriLife Extension office or on the internet at AgriLifebookstore.org.  All your houseplants, garden crops just love rainwater and you will do your share in helping conserve one of our precious natural resources.

Filed Under: Gardening 101, Water Conservation Tagged With: Water Wise Gardening,

eGardening Newsletter for April

April 27, 2015 by stephaniesuesansmith

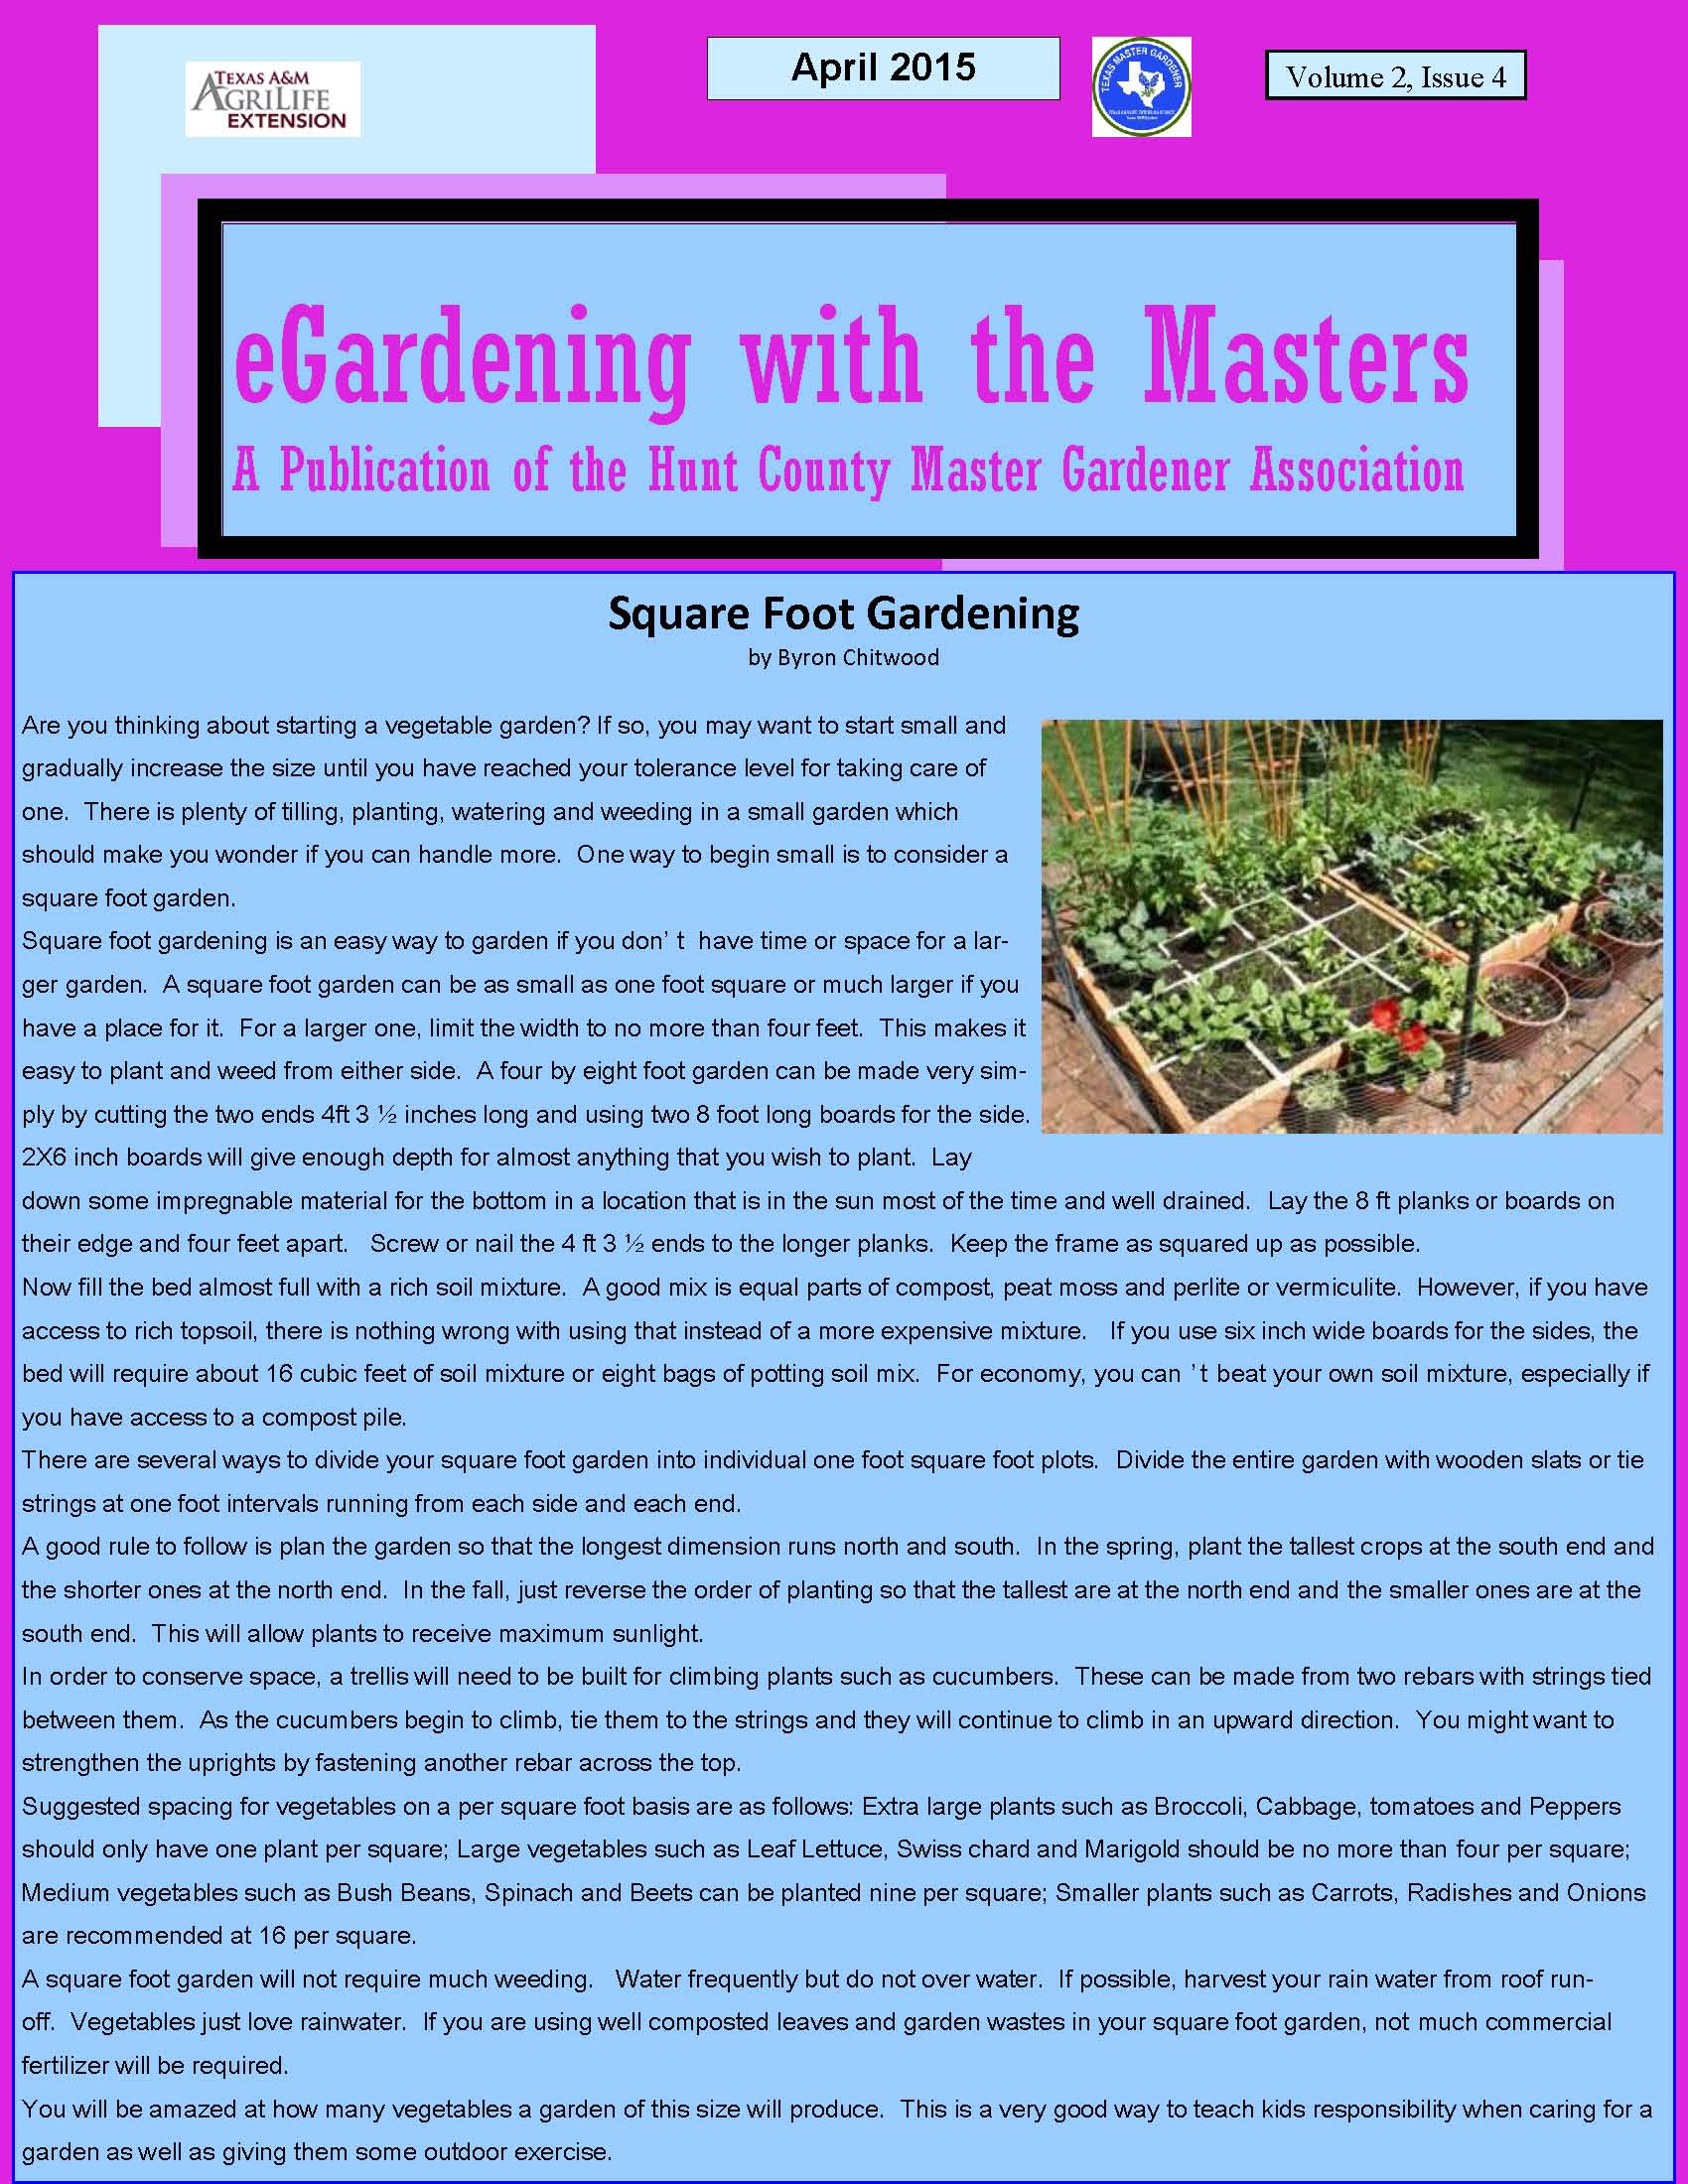
egardening newsletter page 1

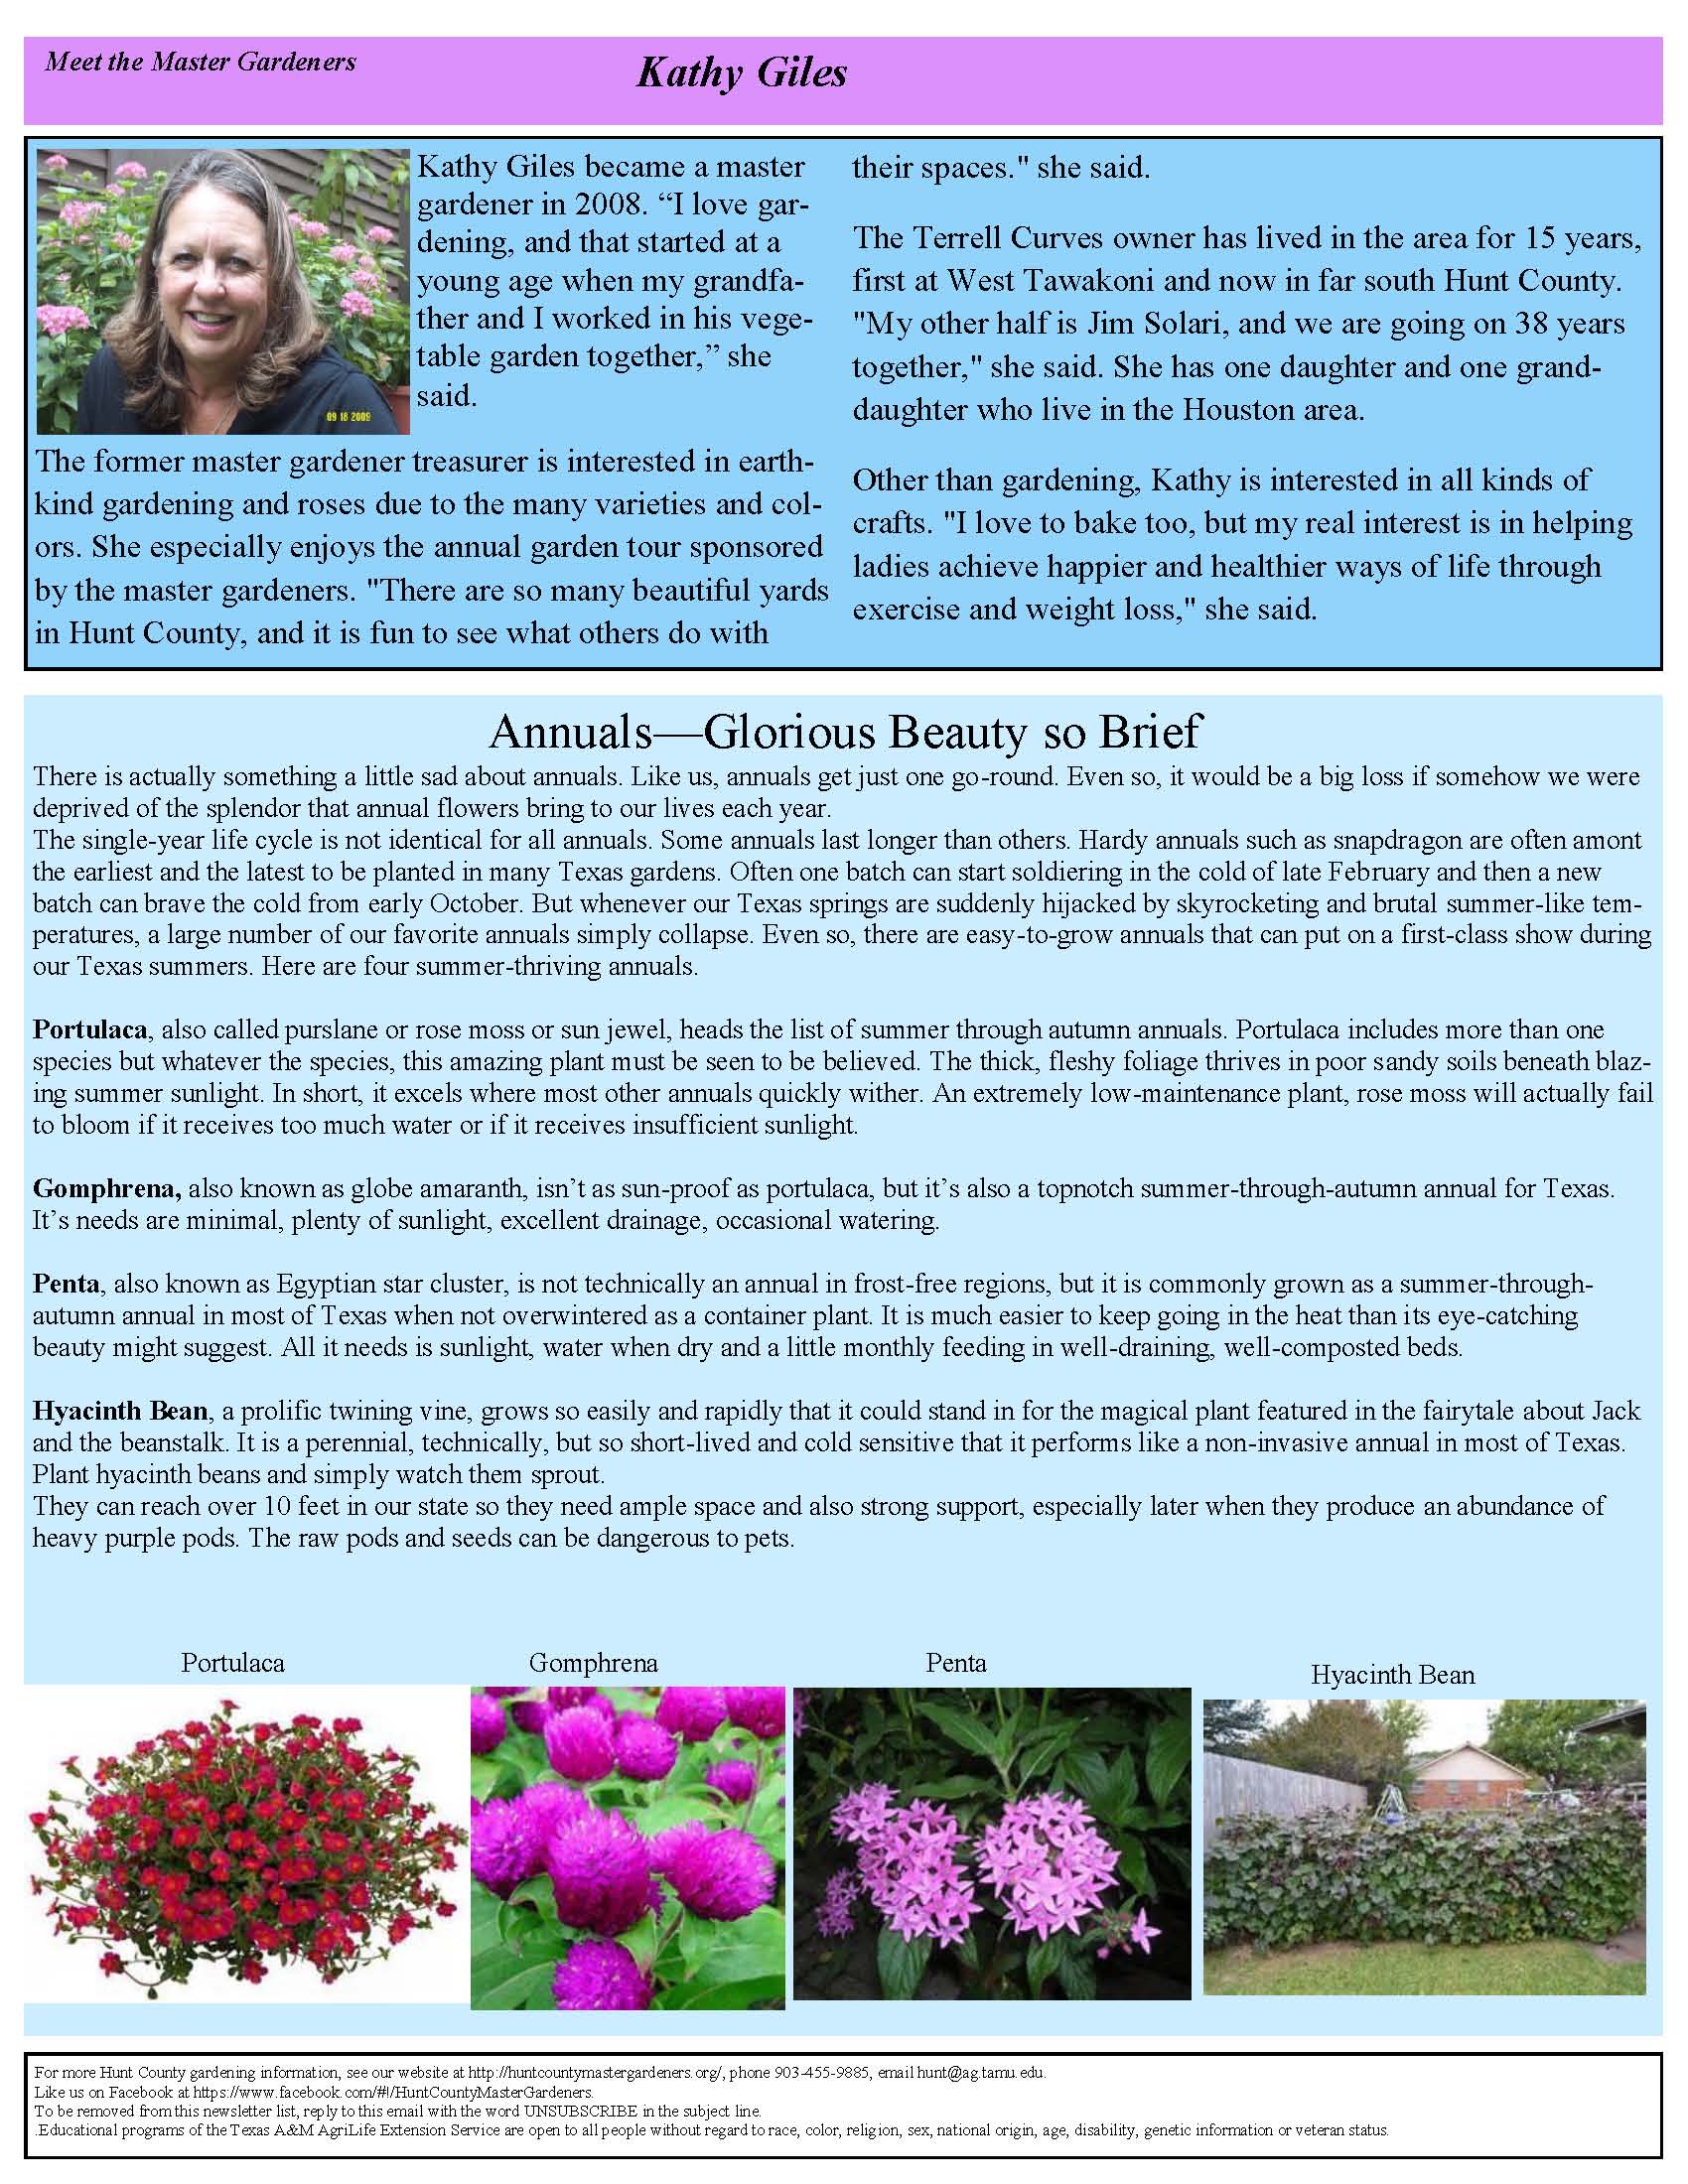
egardening newsletter page 2

Filed Under: Gardening 101, Square Foot Gardening Tagged With: eGardening with the Master Gardeners,

Square Foot Gardening

March 17, 2015 by stephaniesuesansmith

Square Foot Gardening by Byron Chitwood

Some good advice for a person who is thinking about starting a vegetable garden is to start small and gradually increase the size until you have reached your tolerance level for taking care of one.  There is plenty of tilling, planting, watering and weeding in a small garden that should make you think, can I handle more?  One of the best pieces of advice is to consider a square foot garden.

Square foot gardening is an easy way to garden if you don’t have time or space for a larger garden.  A square foot garden can be as small as one foot square and can be much larger if you have a place for it.  For a larger one, limit the width to no more than four feet.  This makes it easy to plant and weed from either side.  A four by eight foot garden can be made very simply by cutting the two ends 4ft 3 ½ inches long and using two 8 foot long boards for the side. 2X6 inch boards will give enough depth for almost anything that you wish to plant.  Lay down some impregnable material for the bottom in a location that is in the sun most of the time and well drained.  Lay the 8 foot planks or boards on their edge and four feet apart.   Screw or nail the 4 foot 3 ½ ends to the longer planks.  Keep the frame as squared up as possible.

Now fill the bed almost full with a rich soil mixture.  A good mix is equal parts of compost, peat moss and pearlite or vermiculite.  However, if you have access to rich topsoil, there is nothing wrong with using that instead of a more expensive mixture.   If you use six inch wide boards for the sides, the bed will require about 16 cubic feet of soil mixture or eight bags of potting soil mix.  Therefore for economy, you can’t beat your own soil mixture for economy, especially if you have access to a compost pile.

There are several ways to divide your square foot garden into individual one foot square foot plots.  Divide the entire garden with wooden slats or tie strings at one foot intervals running from each side and each end.

A good rule to follow is plan the garden so that the longest dimension runs north and south.  In the spring, plant the tallest crops at the south end and the shorter ones at the north end.  In the fall, just reverse the order of planting so that the tallest are at the north end and the smaller ones are at the south end.  This will allow plants to receive maximum sunlight.

In order to conserve space, a trellis will need to be built for climbing plants such as cucumbers.  These can be made from two rebars with strings tied between them.  As the cucumbers begin to climb, tie them to the strings and they will continue to climb in an upward direction.  You might want to strengthen the uprights by fastening another rebar across the top.

Suggested spacing for vegetables on a per square foot basis are as follows:  Extra large plants such as Broccoli, Cabbage, tomatoes and Peppers should only have one plant per square; Large vegetables such as Leaf Lettuce, Swiss chard and Marigold should be no more than four per square; Medium vegetables such as Bush Beans, Spinach and Beets can be planted nine per square; Smaller plants such as Carrots, Radishes and Onions are recommended at 16 per square.

A square foot garden will not require much weeding.   Water frequently but do not over water.  If possible, harvest your rain water from roof runoff.  Vegetables just love rainwater.  If you are using well composted leaves and garden wastes in your square foot garden, not much commercial fertilizer will be required.

You will be amazed at how many vegetables a garden of this size will produce.  This is a very good way to teach kids responsibility when caring for a garden as well as it will give them some outdoor exercise.

References are: All New Square Foot Gardening by Mel Bartholomew and Lasagna Gardening by Patricia Lanza; Don’t Waste Your Wastes-Compost ‘em by Bert Whitehead

Filed Under: Gardening 101, Square Foot Gardening

Choosing and Maintaining Garden Tools

January 13, 2015 by stephaniesuesansmith

Choosing and Maintaining Garden Tools by June Morgan

January is an excellent time to assess the contents of the gardening shed.  Whether a beginning gardener starting anew or needing to replace old and worn out hand tools, quality should take first consideration.  That, and proper care will add much to the pleasure of gardening.

The collection should have at least two spades, one wide bladed for shoveling dirt and compost and a narrow bladed for digging. Add a heavy-tined fork for digging rough ground and a lighter tined for lifting crops.  Two rakes, one for leaves, preferably expandable and a sharp-tined sturdy one for leveling. Smaller hand tools should include trowels, bulb planters, pruners, and a Japanese Hori-Hori knife useful for cutting bags and heavy roots. The latter is serrated on one side and can even take the place of a trowel in some cases. Before grabbing just any tool available at the local big box store, consider the quality of construction.  The junction of the blade and the shaft should have at least two rivets. The shaft should be ash or other hardwood and the metal blade should be the best steel affordable, stainless or an alloy, forged, not stamped and thick enough so as not to be easily bent. Handles should be the right length for the height of the user. Like buying a golf club, the “feel” should be right.

This is especially true of pruners as the best ones are both expensive and a lifetime investment. The most popular brand is Felco as they come in both types, anvil and bypass. The bypass blade is sharp and cuts with the blade like scissors whereas the anvil blades work like a knife on a cutting board. They can come in either right or left handed, several sizes and prices, and some models have replaceable anvil blades.

The larger tools are to be hung on the wall of the shed so as not to dull the blades; the smaller go in a bucket or a portable container. The cleaning equipment should include a file or other sharpening tool, towels, Scotch Brite pads, lubricant, and sterilizer solution. The beveled edges of the tool blades are to be sharpened as needed. After each use, the tools should be hosed, dried, and lubricated with a thin coat of boiled linseed oil (a plant based product) not petroleum, and wiped dry. This sets up a barrier which prevents rust. The sterilizers of choice are hydrogen peroxide or alcohol, not bleach. These are used to prevent transferring pathogens from one plant to another especially in pruning and propagation.

If local stores do not carry the tools that meet the standards, try the higher end nurseries and catalogs that offer some imports and detailed descriptions of the construction. Quality garden tools are not cheap, but the good ones that have been cared for can be handed down for generations.

Filed Under: Gardening 101 Tagged With: Garden Tools,

Bird Feeding in Winter

January 5, 2015 by stephaniesuesansmith

Bird Feeding in Winter by Dave White.

We spend many hours watching and enjoying the numerous species of birds that visit our yard every day. They provide unlimited entertainment, color, activity and music. Some of the native birds frequenting our yard are finches, cardinals, titmice, bluebirds, chickadees, nuthatches, flycatchers, wrens, woodpeckers and crows. There are also many other species who stay for short periods when migrating through our area as they travel to and from their summer and winter destinations.

Everyone can experience the same enjoyment by doing a few simple things to attract birds. A bird friendly yard consists basically of three things; food, water and protective cover or shelter. Creating a garden environment with these items in mind creates a location for birds to feel comfortable and linger. Let’s explore these three requirements in more detail.

Food – Birds need to eat everyday all year. We choose to feed the birds year round to keep them in the vicinity. During the summer they eat more insects, seeds, buds, caterpillars and worms because of availability. They also like to supplement their dining experience on the seed provided in the feeders. Always buy quality birdseed which has a variety of seeds including black sunflower, white millet, cracked corn, peanuts, and safflower. Avoid birdseed containing fillers of milo or wheat. Store the seed in a cool dry place in a covered container to prevent spoilage. Some course sand nearby provides grit for the bird’s gizzards to grind the hard seeds.

Feeders – I like a squirrel proof tube feeder hung on an 8 foot steel shepherd’s hook with a suitable squirrel shield attached. Hanging a feeder from a tree encourages squirrels, possum and raccoons to visit. This is also why I no longer use a platform feeder.

Place the feeder near the edge of the woods, shrubs or garden border which offers partial protection and a place for the birds to roost while waiting their turn at the feeders. Do not locate feeders close to a window which is one of the leading causes of death to startled birds flying into them fleeing a predatory bird. Also avoid placing feeders in large open areas leaving birds vulnerable without protection of a nearby hiding place.

Water – Birds need water to survive. A birdbath with a 2 -3 inch depth provides a place for them to get a drink and bathe. It should be large enough and deep enough for water to last a couple days in the hot summer. Do not add chemicals to control algae or insects. Provide this water source all year. Position the bird bath to prevent water contamination from feeder seed or bird droppings. Clean and replace the water weekly so it does not promote mosquito breeding.

The third item for your bird friendly habitat is to provide protective cover and shelter for the bird’s security and to raise their young. Accomplish this by planting shrubs, vines and flowers such as American Beauty Berry, Hawthorn, Hollies, Viburnum, Carolina Jessamine, zinnias, asters or marigolds nearby. I also found recommended designs for bluebird houses are used by numerous native bird species.

Filed Under: Gardening 101, Wildlife Tagged With: Birds,, Winter

eGardening With The Master Gardeners

December 15, 2014 by stephaniesuesansmith

December 2014_Page_1

December 2014_Page_2

Filed Under: Gardening 101

Using Plants as Holiday Centerpieces

November 12, 2014 by stephaniesuesansmith

Using Plants as Holiday Centerpieces by June Morgan

This is the time to think about centerpieces for the holiday tables.  Catalogs offer glitzy and expensive arrangements, but the savvy gardener can use a lot of what is at home for a do-it-yourself project.

For autumn, pumpkins and gourds are indispensible, coming in many colors and striations. Cut pumpkins to use as candle holders or to hold a pot of blooms or greenery. For different heights and lengths of the overall design, use trailing evergreens (please avoid poison ivy or oak), Indian corn, or foraged grasses, many of which look ordinary from afar but interesting when close up. Mimic a sheaf of wheat by tying together mature grasses  and place vertically in your arrangement. Shop at thrift stores such as Goodwill for inexpensive decorative objects such as vases, figurines and bowls. You will be surprised at what you find. Fillers such as sphagnum, small twigs and branches can add a unifying effect. One warning – sphagnum acts as a wick, so don’t let it touch water, or everything surrounding, including the table and cloth will be soaked.

Prepare ahead of time for when nothing in the garden is blooming by rooting cuttings of plants such as coleus in water (this takes only days), and starting bulbs such as amaryllis and paperwhites (narcissus) which require no chilling time. You can grow these bulbs in a pot filled with soil or in a shallow bowl, using pebbles to hold them in place. Add water up to the bottom quarter or third of the bulb. To keep them from growing too tall and floppy, use one part 80 proof vodka to seven parts water. Starting bulbs which require chilling time such as mini daffodils, hyacinth and tulips indoors is possible but needs more time and preparation. Coleus is especially useful because of the ease in growing, propagating, and the many variations in colors and patterns. After serving duty in the table décor, they can be enjoyed in a sunny spot all winter in pots. Cyclamen, readily found in nurseries in rousing reds, pinks and white is especially effective in Christmas displays with artificial snow or angel hair.

Plants can serve as a basis for many other creative ideas. Think feathers, glitter, candles, small LED lights (the battery pack can be easily hidden), artificial or real moss, rocks, ribbons, etc. Look around your house and yard and even the fields with open eyes.

Some online resources for floral design material: “Mearsfloral.com”, Afloral.com or “Gardeners Supply”.  Catalogs can give ideas which can be an inspiration for or replicated with your own resources.

Filed Under: Gardening 101, Ornamentals Tagged With: Holiday Centerpieces,, Winter

  • « Go to Previous Page
  • Page 1
  • Page 2
  • Page 3
  • Page 4
  • Interim pages omitted …
  • Page 6
  • Go to Next Page »
Find Us on Facebook logo

Articles by Topic:

  • Composting
  • Earth-Kind
  • Entomology
  • Events
  • Flowers
  • Fruits and Nuts
  • Gardening 101
  • Herbs
  • History
  • Keyhole Gardens
  • Ornamentals
  • Plant Diseases
  • Recipes
  • Roses
  • Seeds
  • Square Foot Gardening
  • Trees
  • Turf
  • Vegetables
  • Water Conservation
  • Wildlife
  • Winter

Article Key Words

African Violets Asparagus Bag Worms, Bees Birds, Bluebonnets, Brown Patch, Butterflies, Composting Dragonflies eGardening with the Master Gardeners, Fall Tomatoes, Fire Ants, Fruit Trees Garlic, Gifts, Grapes, Grasshoppers, Greenhouses, Keyhole Gardens Late Fall Vegetables, Late Spring Gardening, Leeks Notable Texas Gardens, Onions, Poison Ivy, Poisonous Plants, Potatoes Propagation Pruning Trees, Rainwater Harvesting, Raised Beds Rose Hips Spider Mites, Spring Vegetable Gardening Squash Bugs, Summer Trees & Shrubs, Turf Grass, Valentines, Vegetables Watering Water Wise Gardening, Wildflowers, Winter
Texas A&M AgriLife Extension Service
Texas A&M University System Member
  • Compact with Texans
  • Privacy and Security
  • Accessibility Policy
  • State Link Policy
  • Statewide Search
  • Veterans Benefits
  • Military Families
  • Risk, Fraud & Misconduct Hotline
  • Texas Homeland Security
  • Texas Veterans Portal
  • Equal Opportunity
  • Open Records/Public Information